
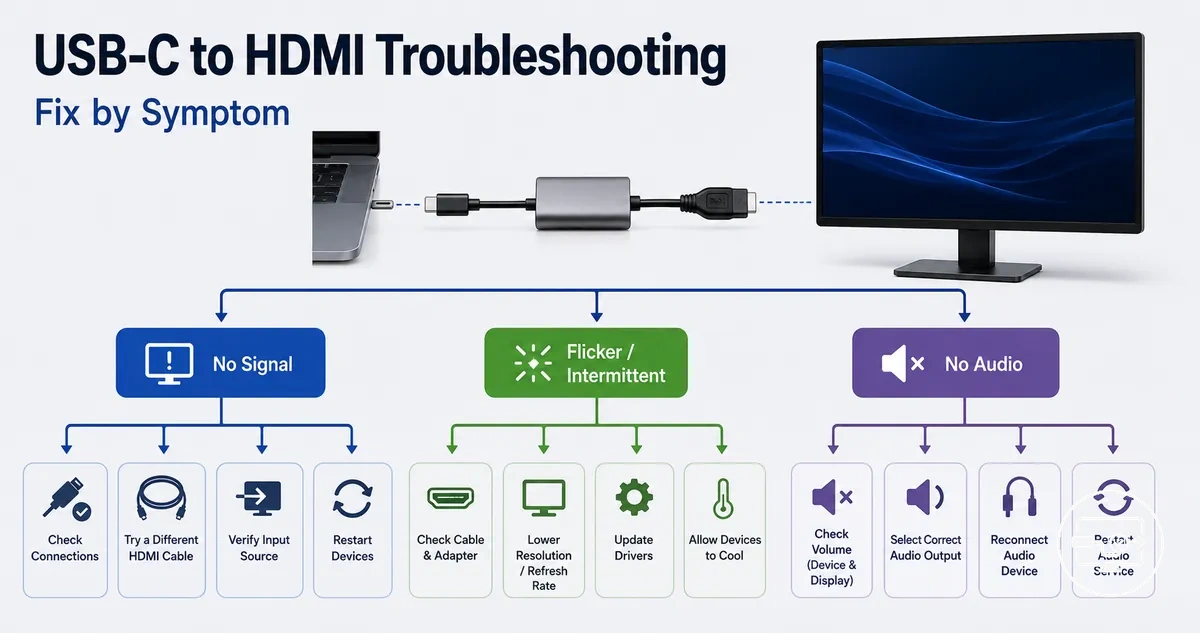
Troubleshooting USB-C to HDMI Compatibility by Symptom
Most USB-C to HDMI failures can be traced to one of four connection layers: the source device, the converter (adapter, hub, or dock), the cable, or the display. A break in the signal path — not a single defective component — is often the cause, and symptom-led checks help isolate the layer.
A common source of failure is a USB-C port that lacks DisplayPort Alt Mode; it cannot send a video signal regardless of adapter quality. A secondary failure layer involves the handshake between the source and the display. The adapter, hub, or dock may connect electrically, but the display may not recognize the signal due to incompatible resolution settings, bandwidth limits, or cable length. A third category involves the display itself: older HDMI inputs may not negotiate properly with a modern USB-C source.
Different symptoms point to different layers.
- A black screen with no detection usually points to the source port or converter.
- Flickering or intermittent signal often points to cable or power issues.
- No audio while video works suggests a settings or EDID mismatch.
Starting with the symptom and checking each layer in order — source first, then converter, then cable, then display settings — can help prevent unnecessary replacements.
A single symptom does not confirm a single cause. For example, flickering can come from a loose cable, insufficient power, or a bandwidth limitation. Each symptom should be matched with at least one confirmatory observation before concluding which layer is failing. This approach can help avoid misdiagnosis and keeps the focus on the actual constraint.
Troubleshooting Scope Boundaries for USB-C to HDMI Compatibility Failures
A compatibility failure is a hardware or protocol gap that prevents the conversion path from completing; a setup mistake involves correct hardware that is not properly selected or routed. The chain runs from the source device's USB-C port through the adapter or hub conversion path to the HDMI input on the display. The USB-C port's video output capability is usually the first link that determines whether the chain can start; a port that lacks video output is a capability constraint, not a configuration issue.
A missing video-output feature is often mistaken for a fixable glitch. Capability constraints arise when the USB-C port, adapter, or cable cannot support required video output, while setup mistakes involve input selection or OS display settings. A missing video-output feature is out of scope here; the in-scope alternative is to verify the port specification before proceeding with other checks. The capability requirements that define this boundary are covered in the USB-C to HDMI Compatibility hub.
Boundary signals that separate capability constraints from configuration errors include:
- Port capability – a USB-C port lacking video output is a capability barrier.
- Display input – an unselected HDMI input is a setup mistake, not a hardware fault.
- Cable path – a damaged or loose cable interrupts the conversion path and usually requires replacement.
- Adapter compatibility – an adapter not supporting the needed resolution or refresh rate is a capability mismatch.
- OS routing – a display mode set to duplicate, extend, or project-only is a configuration choice.
- Power delivery – some adapters require external power; insufficient power can mimic a capability failure.
This chart shows how to separate hardware or protocol compatibility failures from simple configuration errors in a USB-C to HDMI connection.
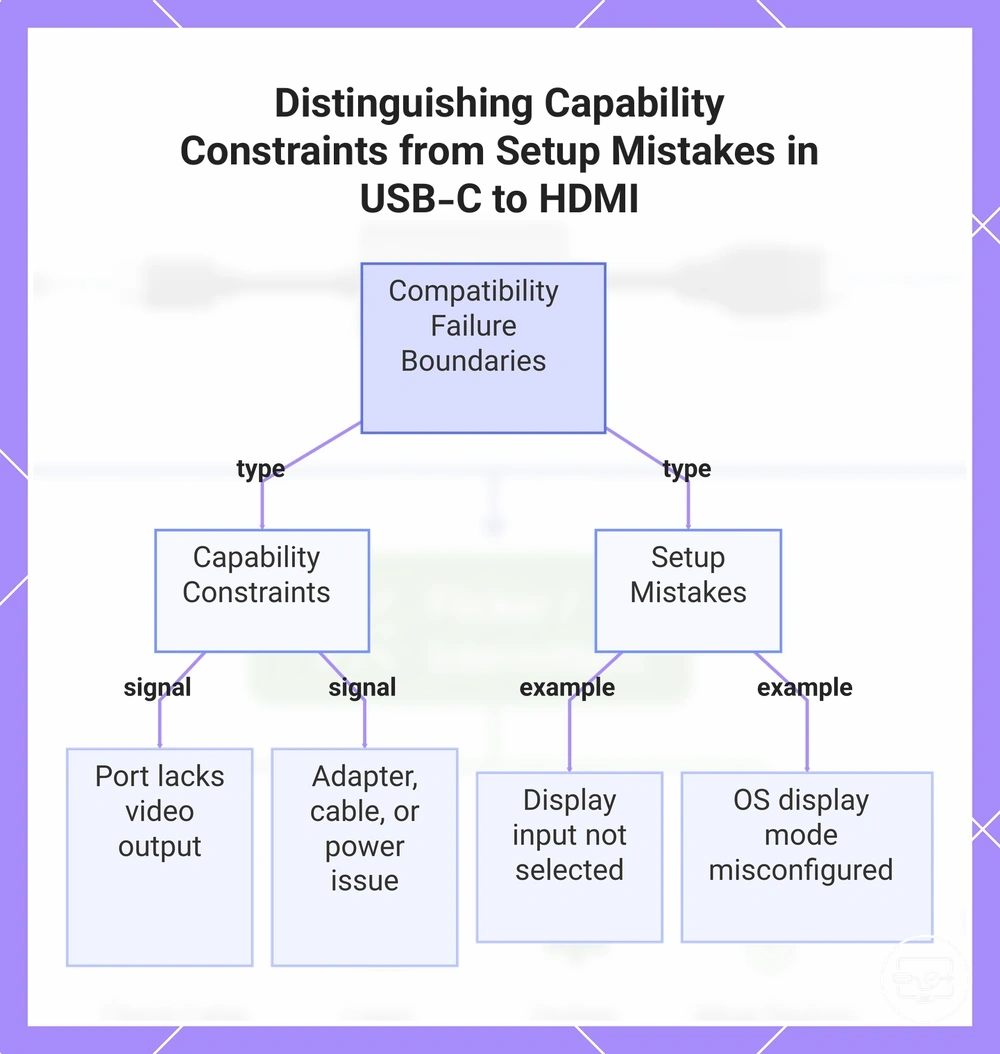
Compatibility failure signals vs setup, input, or settings mistakes
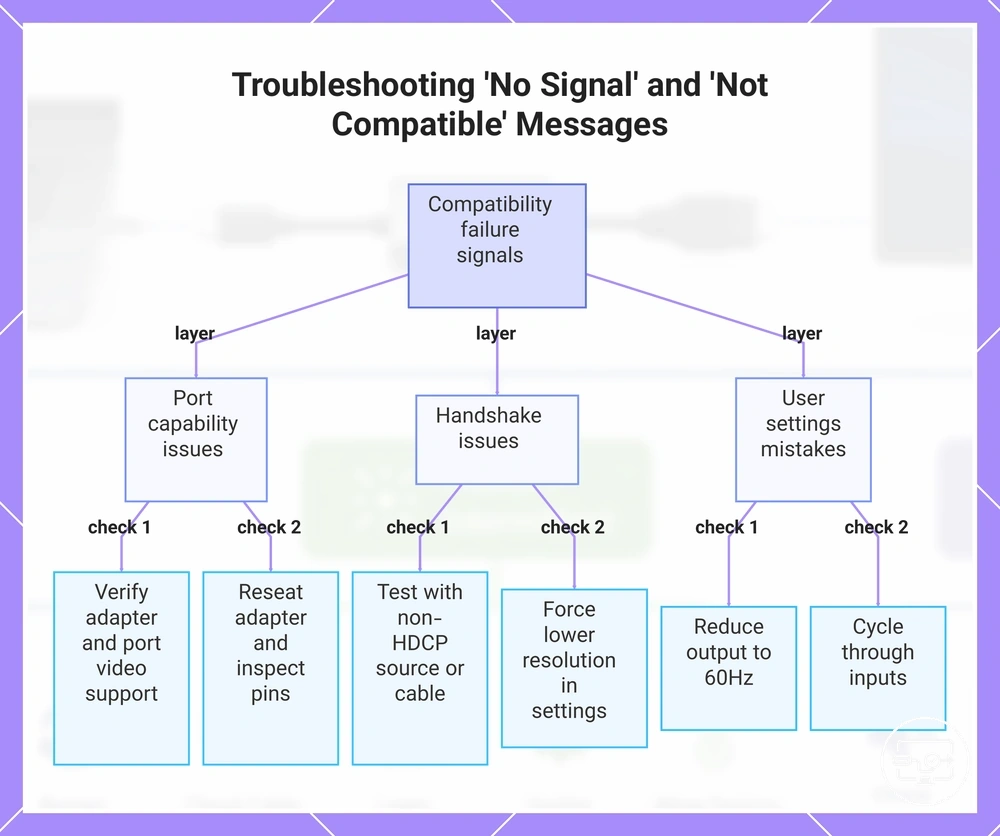
A 'no signal' or 'not compatible' message usually comes from a genuine compatibility issue—such as a resolution or handshake mismatch—or a setup mistake like a loose cable or wrong input. The failure layer tells you what to check next.
- Port capability: no signal → likely USB-C port lacks DisplayPort Alt Mode → verify adapter and port support video output.
- Port capability: intermittent signal → likely adapter not fully seated or damaged → reseat adapter and inspect for bent pins.
- Handshake: no signal or flicker → likely HDCP negotiation fails → test with a non-HDCP source or different cable.
- Handshake: black screen but signal detected → likely EDID mismatch reports unsupported format → force lower resolution in source settings.
- Display mode: signal detected but out of range → likely output exceeds limits → reduce to 60Hz in OS settings.
- Display mode: no signal in extended desktop → likely primary display not recognized → toggle to mirror mode temporarily.
- Input selection: no signal → likely TV set to wrong HDMI port → cycle through inputs.
- Input selection: no signal after connecting → likely display not on new input → manually select correct source.
The same 'no signal' can come from two different failure layers:
- Handshake: no signal → likely negotiation failure → check cable/firmware.
- Input selection: no signal → likely wrong source → verify input menu.
This chart maps the three main failure layers for compatibility signal issues and the recommended checks to identify the root cause.
Hardware fault signals that troubleshooting cannot fix safely
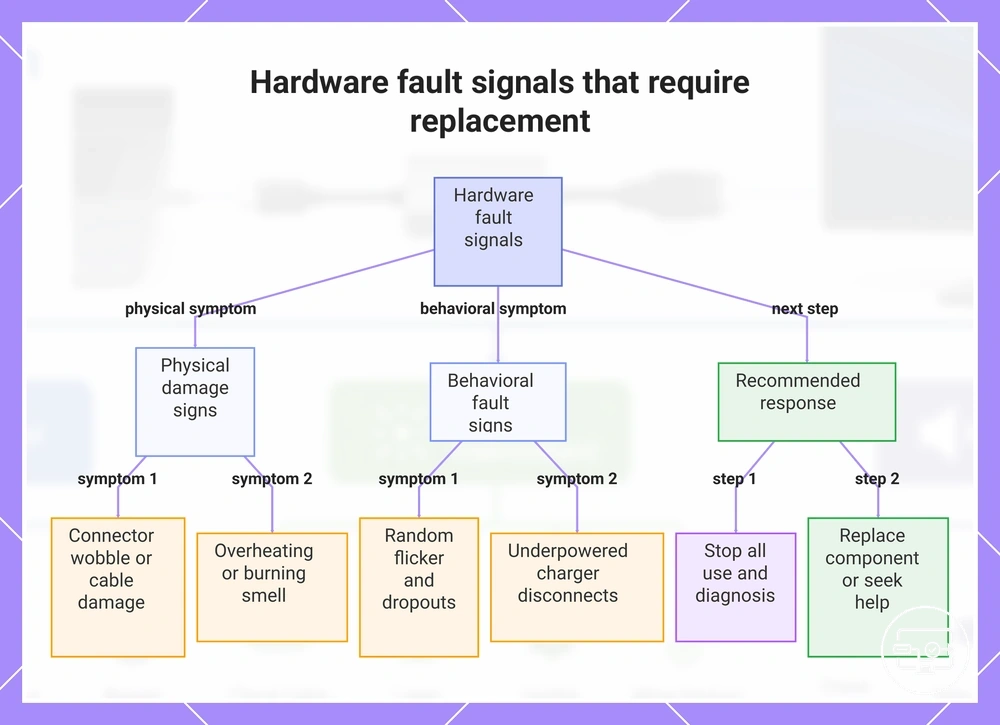
A hardware fault in a USB-C to HDMI chain is a physical component failure that prevents reliable signal delivery and signals that the next action should be replacement or professional support, not continued troubleshooting. Observable signs of such a fault include:
- The USB-C connector has noticeable wobble or physical play when inserted, leading to intermittent contact and display flicker or dropouts.
- The cable (USB-C or HDMI) shows visible damage such as bent pins, frayed insulation, cracked connectors, or kinked sections.
- The hub or dock becomes abnormally hot during use, especially when the display loses signal under a heavy graphics load.
- Display flicker or blackouts occur at random intervals without any physical disturbance to the cable or ports.
- The signal drops out only when the cable is moved or held at a specific angle, suggesting internal wire breakage near the connector.
- A burning smell or discoloration is noticeable near the USB-C port, the hub, or the power adapter.
- The system detects the display only intermittently, often requiring multiple reconnections to get a stable image.
- Using an underpowered charger causes the display to disconnect when the laptop demands more power.
When any of these fault signals appear, stop all further use and diagnostic attempts. Instead, replace the affected component or seek professional assistance to avoid the risk of damage to the display or device.
This chart shows the observable signs of a USB-C to HDMI hardware fault and the recommended action to take instead of continued troubleshooting.
Baseline checks that resolve most USB-C to HDMI “not working” outcomes
Baseline checks resolve most USB-C to HDMI not working outcomes by isolating common failure points—port capability, cable quality, adapter behavior, and display input—before symptom-specific steps. A single overlooked variable, such as a port that does not support video output or a cable that cannot carry the required signal, can mimic a hardware failure and cause misdiagnosis.
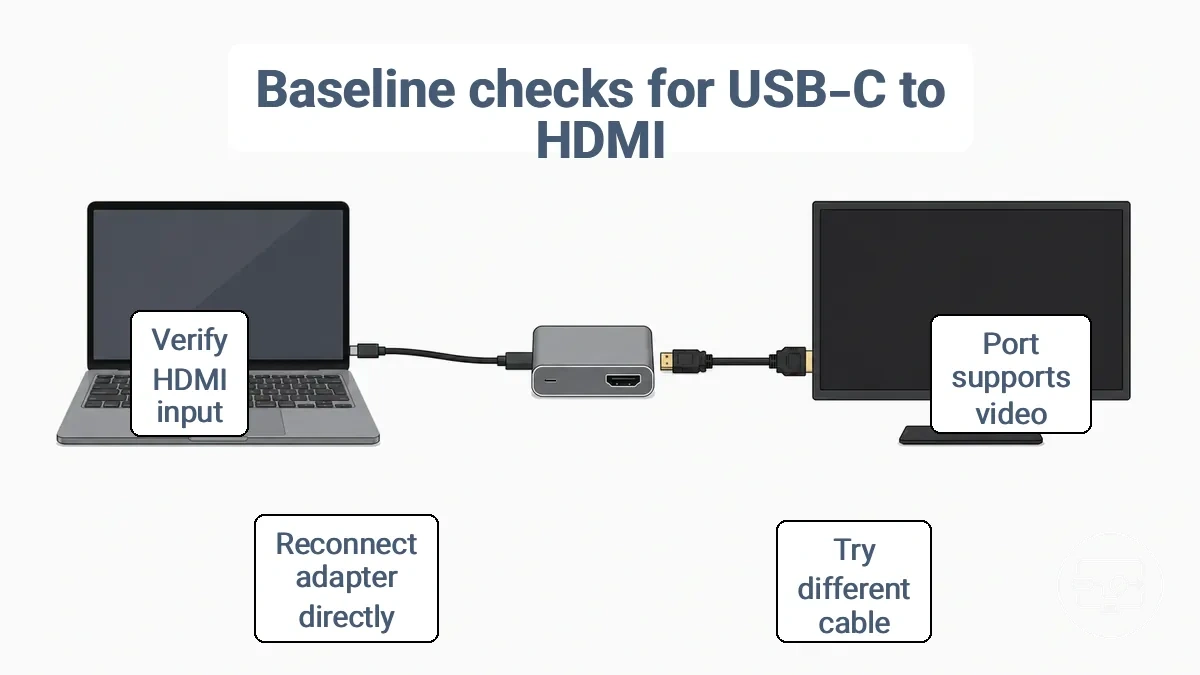
- Confirm the USB-C port supports video output. Check for a DisplayPort, Thunderbolt, or monitor icon next to the port. If no icon is present, consult the device manual—many USB-C ports are charge-only or data-only.
- Try a different USB-C cable. Use one known to work with video or from a monitor. A cable that works for charging may lack the high-speed lanes needed for video.
- Reconnect the adapter or hub directly to the device. Avoid extension cables or daisy-chaining. A direct connection reduces the risk of signal loss.
- Switch to a different USB-C port on the device. Some ports have different capabilities—video output may work on one port but not another.
- Verify the HDMI cable is fully seated at both ends. Push until it clicks. A loose connection can cause no signal or intermittent dropouts.
- Test the HDMI cable with another source. Connect it to a known-working device such as a game console or Blu-ray player. If it works there, the issue is upstream.
- Check that the display is set to the correct HDMI input. Cycle through input sources using the monitor’s remote or on-screen menu. The display may be on a different input, showing no signal.
- Power-cycle the adapter or hub. Unplug it from power and the device, wait 10 seconds, then reconnect. Some hubs need a full reset to renegotiate video and power delivery.
- Ensure the hub or adapter receives adequate power. If it has a power input, connect it to a wall charger. Underpowered hubs can cause intermittent video or detection failures.
- Test with a different adapter or hub. Borrow one from another device if possible. A faulty adapter is a common cause of “not working” outcomes.
- Reduce the number of peripherals connected through the hub. Disconnect USB devices, Ethernet, or other accessories. Bandwidth sharing can cause video dropouts when the hub is under load.
- Restart the source device. A full reboot clears temporary display driver states, and the device may detect the display on the next connection.
If all baseline checks pass and the issue persists, proceed to the symptom-specific router below.
- If the display is detected but blank: The signal is reaching the monitor but the image is not rendering. This often points to a resolution or refresh rate mismatch, or a power-delivery issue to the adapter.
- If the display is not detected at all: The source device does not see the monitor. This typically indicates a problem with the USB-C port, cable, adapter, or HDMI input.
Verify USB-C video output support and the adapter or cable conversion path
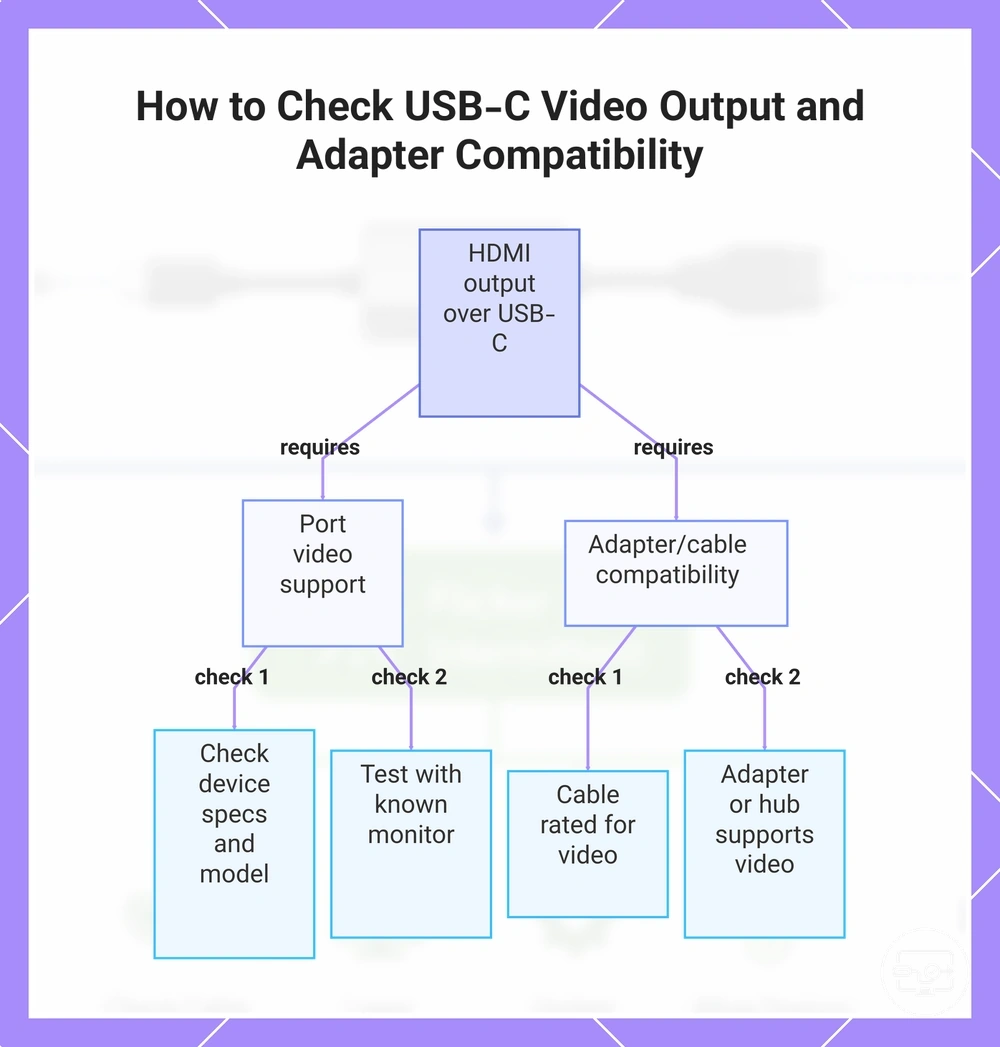
HDMI output over USB-C requires two conditions to be met: the device port must support video output, and the adapter, cable, or hub must carry that video signal correctly. A USB-C port that charges or transfers files may lack the internal signal routing needed for video.
- Port: Look for phrases like ‘video output’ or ‘USB-C supports display’ in your device specifications. If the port shows a lightning bolt or DP icon, it may be video-capable, but symbols are not always a reliable indicator.
- Port: Check the exact model on the manufacturer’s support page. A laptop model line can have different configurations where one USB-C port outputs video and another only charges or transfers data.
- Port: Test the port directly with a monitor known to work with USB-C video. If the display stays black, the port likely does not support video output.
- Port: A port described as ‘USB-C Power Delivery only’ may charge your device but is not designed for video. Understanding that a charging-only USB-C port is not meant for video helps avoid false expectations.
- Converter: The adapter or cable must be compatible with video signals. Many USB-C cables are built for charging only and typically cannot carry the high‑speed lanes needed for stable video at higher resolutions.
- Converter: A cable explicitly rated for video (often labeled as full‑featured USB‑C or certified Thunderbolt) can carry the video signal. Packaging that mentions monitor support is a good sign.
- Converter: Using a USB‑C to HDMI adapter requires that the adapter itself supports video conversion. Some adapters expect a video signal from the port; they typically cannot create one if the port does not output video.
- Converter: A hub or docking station introduces additional signal handling. Check that the hub also supports video output through the USB‑C port you are using; not every port on a hub carries video.
This chart shows the two main conditions required for HDMI output over USB-C: port video support and adapter/cable compatibility, with checks to verify each.
Reset the handshake path to eliminate cable, input-selection, and connection-order errors
Resetting the handshake path using a fixed disconnect and reconnect order often resolves black screen or 'not detected' problems without hardware replacement.
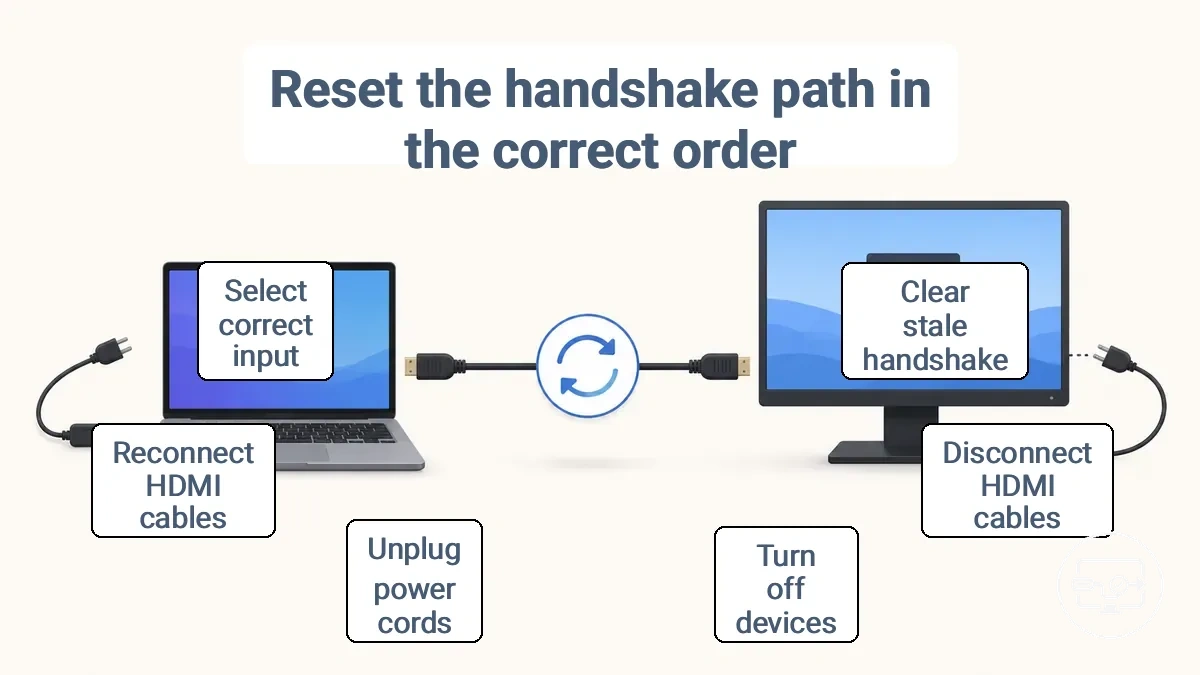
- Disconnect all HDMI cables from every HDMI port in the signal chain to clear stale handshake state.
- Turn off all source, intermediate, and display devices to begin the power cycle.
- Unplug the power cords from all devices for at least one minute to complete the power cycle.
- Reconnect the HDMI cable from the source device's HDMI port to the receiver or directly to the display to re-establish the primary link.
- If using an intermediate device, reconnect its HDMI cable to the display to complete the signal chain.
- Power on the display and select the correct HDMI input to restore the signal.
If still not detected, move to symptom routing.
For a repeatable process covering the full connection sequence, review the setup steps to retry.
Stabilize power and bandwidth conditions that trigger intermittent HDMI behavior on hubs and docks
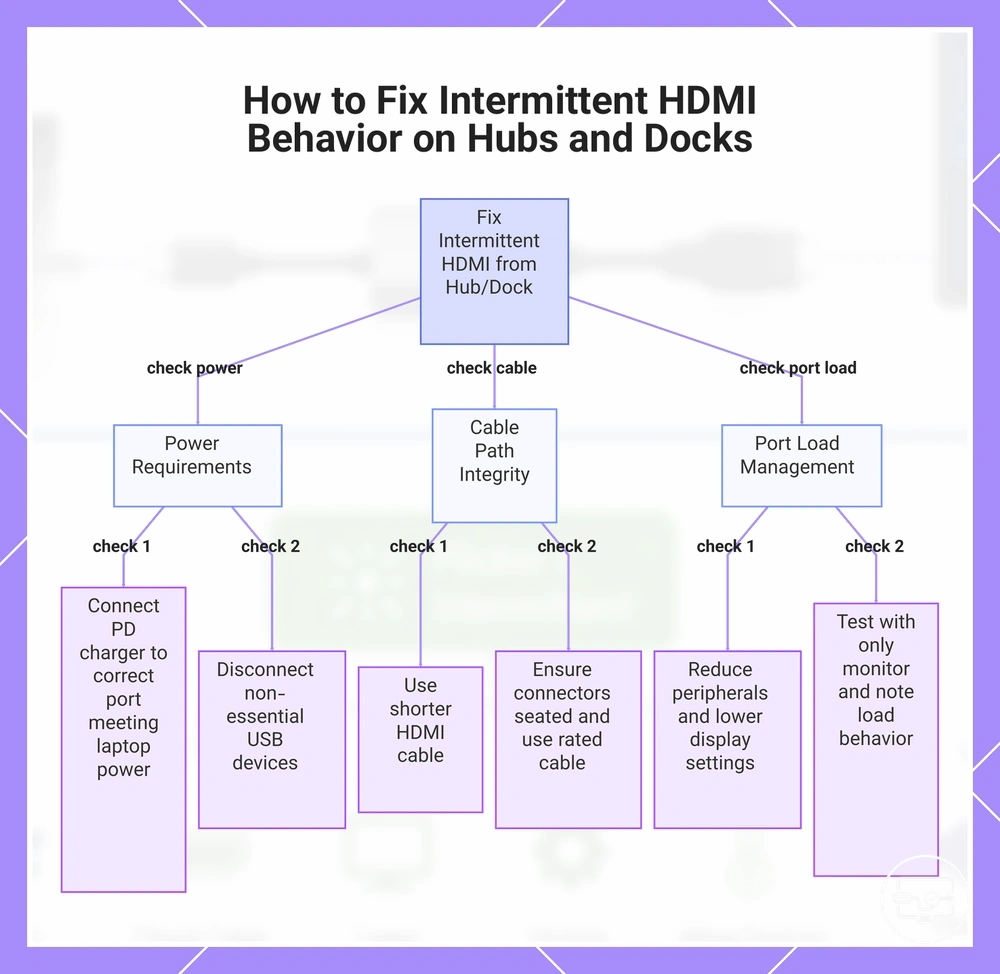
Flickering, dropouts, and brief black screens from a hub or dock are stability symptoms triggered by power, cable path, or bandwidth pressure rather than a hardware defect. Intermittent signal loss or reconnections typically point to one of these three areas.
As the hub handles more devices or higher-demand output modes, available power and bandwidth margin shrink, making the display signal more vulnerable. A low-power state or long cable path further reduces stability.
To avoid false conclusions, change only one variable at a time when testing—swap the cable, disconnect a peripheral, or switch to a lower-demand output mode.
- Power
- Connect the hub’s PD input to a charger that meets the laptop’s power requirements.
- Avoid running the hub on battery power alone when multiple devices are connected.
- Disconnect non-essential USB devices to reduce power draw.
- Check that the charger is plugged into the correct PD port on the hub.
- Cable path
- Use a shorter HDMI cable when possible; longer cables increase signal degradation risk.
- Ensure all connectors are fully seated and free from damage.
- Try a different HDMI cable rated for the needed resolution.
- Avoid extension cables or adapters that add extra connection points.
- Port load
- Reduce active peripherals when the display becomes unstable.
- If using multiple monitors, lower resolution or refresh rate on one or both displays.
- Disconnect high-bandwidth devices like external SSDs during video output to free bandwidth.
- Test the hub with only the monitor connected to isolate port load effects.
For diagnostic guidance, note whether the symptom is worse under load (e.g., during file transfers or multi-display use) or appears randomly, to distinguish bandwidth pressure from a general stability issue.
This chart shows troubleshooting steps for intermittent HDMI from hubs or docks, focusing on power, cable path, and port load checks, plus a diagnostic note for identifying bandwidth pressure.
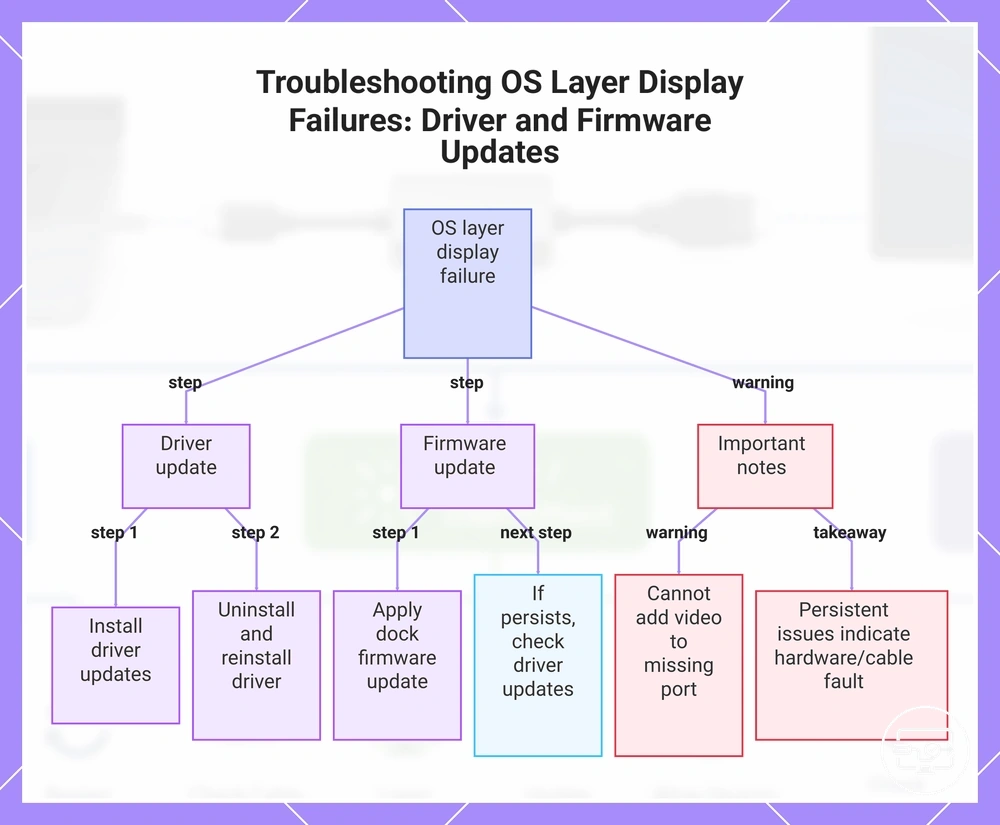
Update or reinstall device display drivers and firmware when the OS is the failure layer
Driver or firmware updates are justified when the OS layer is the failure point. If display output drops, flickers, or fails to detect after a system update, the graphics stack or dock firmware may be corrupted or misconfigured.
Updating or reinstalling the display driver and refreshing dock firmware can restore detection and stability, but these actions do not add video output to a port that lacks it by design.
- Check for display driver updates through your operating system's update mechanism or device management utility. Install any available updates and restart the system.
- If issues persist, open the device management utility, expand display adapters, right-click the graphics driver, and select Uninstall device. Check the option to delete the driver software, then restart. The operating system will reinstall a default driver on reboot.
- After the restart, retest the same USB-C to HDMI chain using the same cable, dock, and monitor. If output returns, the driver refresh resolved the problem.
- For dock-related issues, check the manufacturer's support page for firmware updates. Download and apply them according to the provided instructions, then restart the dock and computer.
- After applying dock firmware, retest the same chain without changing any other hardware or cable.
- If the dock firmware update does not help, check for graphics driver updates through your operating system's update mechanism or device management tool.
- After any driver or firmware update, retest the same chain. If drops or detection failures persist with the same setup, the cause is likely hardware or cable rather than the OS layer.
This chart shows the steps to resolve display issues caused by OS layer failures, including driver updates, firmware updates, and key limitations.
Symptom routes to isolate the failure layer in a USB-C to HDMI connection
To isolate the dominant failure layer in a USB-C to HDMI connection, start by reading the symptom pattern correctly. Each symptom points to a different layer: port capability, handshake, driver settings, or display input.
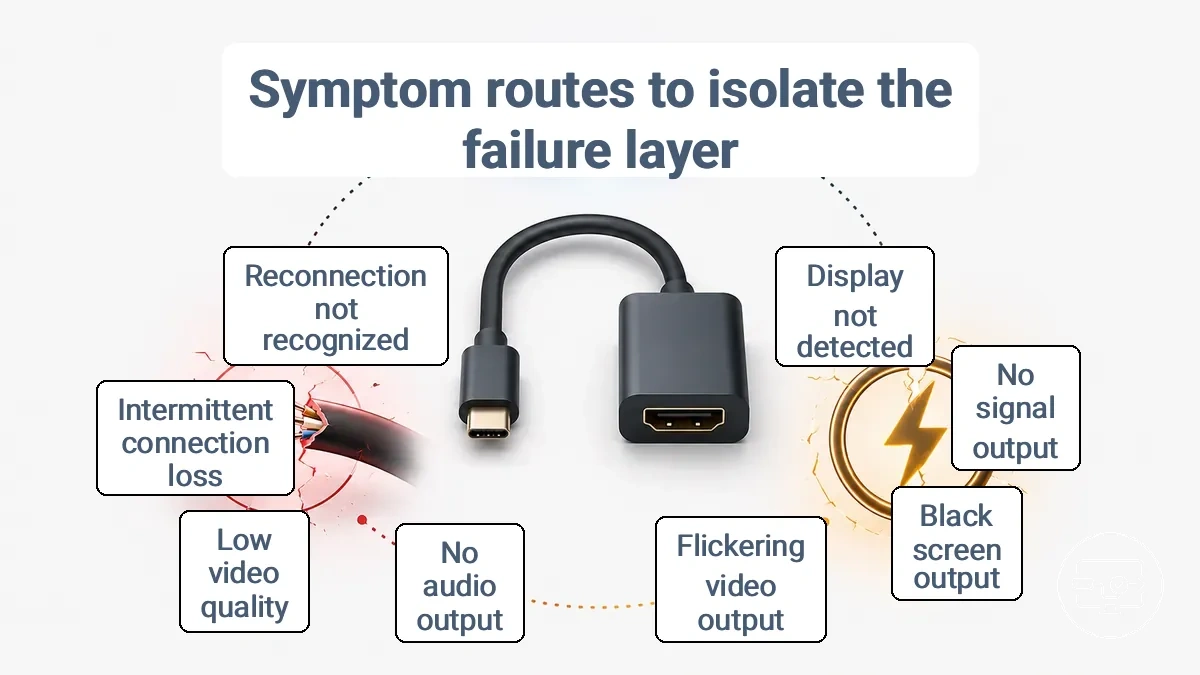
- Display not detected: Likely handshake; test the source device with a known-working monitor to verify USB-C port supports DisplayPort Alt Mode; if the monitor appears in display settings, port and cable are likely functional.
- Display detected but no signal: Likely input selection; verify the monitor is set to the correct HDMI input; if an image appears, handshake is likely complete.
- No signal / black screen: Likely cable; try a different full-feature USB-C cable; if a stable image appears, the cable supports video.
- Flickering or intermittent dropouts: Likely unstable power; power the monitor separately using a dedicated charger; if stability improves, power delivery is likely adequate.
- No audio output: Likely audio output setting; check system sound settings to confirm HDMI output is selected; if audio plays, the correct device is selected.
- Low resolution or poor video quality: Likely bandwidth limitation; manually set the display resolution to the monitor's native resolution; if the image is sharp, bandwidth is sufficient.
- Intermittent connection dropouts: Likely unstable physical connection; check that both USB-C and HDMI plugs are fully seated; if dropouts stop, the connection is stable.
- Device not recognized after reconnection: Likely driver layer; restart the source device with the adapter attached; if the adapter appears in device manager, the driver is loaded.
No signal or black screen symptoms and the fastest isolation sequence
Common causes of no signal or black screen in a USB-C to HDMI chain include a source port that does not support video output, loose connections, incorrect input selection, or faulty cables and adapters. For a repair walkthrough, see our no signal or black screen fixes page.
- Verify the source device is powered on and its USB-C port supports video output; if it does not, the screen may remain blank.
- Fully insert the USB-C adapter into the source and the HDMI cable into both the adapter and the display; loose connections may cause a no signal screen.
- Confirm the display’s input selection is set to the correct HDMI port; an incorrect input may cause a black screen.
- Swap the HDMI cable and test a different adapter; detection after swapping suggests the original component was likely faulty.
- Connect the source to another display or a different HDMI port on the same display; if the second display works, the original port or display may be the issue.
- Test a different source device with the same adapter and display; if the second source works, the original source may be the cause.
Protected content playback failures can also cause a black screen without a no signal message, even when the cable and input selection are correct.
Flickering, dropouts, or intermittent connection symptoms and the stability checkpoints
Flickering, dropouts, or intermittent connection symptoms typically point to a stability or negotiation problem under load rather than a capability gap. Use the checkpoint checklist below, grouped by cable path, power state, and output mode, to isolate the variable.
- Cable path: Check cable length and condition; longer or damaged cables introduce flickering under high bandwidth.
- Cable path: Verify cable is fully seated at both ends; loose connections cause intermittent dropouts.
- Cable path: Test with a short, high-quality cable to isolate cable-related symptoms.
- Power state: Confirm the USB-C port or hub provides sufficient power for sustained output; insufficient power leads to dropouts.
- Power state: Disconnect other peripherals from the hub to reduce power draw and check if flickering stops.
- Power state: If using a hub, connect it to a powered port or external adapter to improve stability.
- Output mode: Lower the resolution or refresh rate temporarily to see if flickering decreases.
- Output mode: Switch to a different output mode (e.g., from 4K to 1080p) to test whether bandwidth pressure may be causing intermittent dropouts.
- Output mode: Disable HDR in the display settings and observe whether intermittent disconnects stop.
A confirmation test — change one output variable (e.g., resolution or refresh rate) and observe whether symptoms change — can indicate whether bandwidth pressure is a likely cause. After completing the checklist, review the 4K and HDR compatibility checks to rule out format-specific negotiation problems.
No audio over HDMI symptoms and how to separate routing settings from adapter limits
No audio over HDMI is usually an output routing or sink-side setting rather than a video compatibility problem, often occurring while video still works. This problem, often called no audio over HDMI, can be isolated by checking two main areas: the operating system audio output selection and the behavior of the connected TV, monitor, or receiver.
- Check the OS playback devices list; confirm the HDMI output (labeled as your TV, monitor, or receiver) is set as the default device and is enabled.
- Check the HDMI output connection status; confirm it shows as connected (not 'not plugged in'). If it shows as disconnected, restart the audio service or reboot the PC with the HDMI cable connected and the display powered on.
- Check the audio properties of the HDMI output; confirm the format and sample rate match what your display or receiver supports (e.g., 16-bit, 48000 Hz).
- Check the volume and mute state for the HDMI output; confirm it is not muted and its volume is set appropriately (separate from system volume).
- Check any audio enhancement or spatial sound setting; confirm it does not override the output route.
On the display or receiver side, verify the following:
- Check the input source on the TV or receiver; confirm it matches the HDMI port to which the adapter is connected.
- Check the audio settings on the display or receiver; confirm it is set to accept audio from HDMI (some models require selecting ‘HDMI audio’ or ‘external speakers’).
- Check that the display or receiver supports audio over the specific HDMI input; confirm it supports audio over that port (some older models may not).
- Check the cable connections; confirm they are secure. Try a known‑working HDMI cable to rule out a cable fault.
If all these checks pass—meaning the OS shows the HDMI output as the selected default device, the display or receiver is set to the correct input and audio source, and audio plays from the intended speakers—then the issue is not likely a routing or adapter limit.
Display not detected symptoms and how to validate detection and negotiation layers
When a display is not detected, the cause is often a failure in signal negotiation, physical continuity, or the OS display mode. This condition is called a display not detected situation—the monitor shows no signal and the operating system does not list it.
Note: if the OS detects the monitor but the screen stays black, treat that as a no-signal path and follow the same diagnostic sequence.
- Check the cable and port by connecting the monitor directly to a known‑working port on the source using the same cable. If the display is detected, the original port or cable is the failure point. If not detected, move to step 2.
- Make sure the monitor is powered on and set to the correct input source. If the display is still not detected after this, proceed to step 3.
- Rebuild the display handshake by disconnecting the video cable from both ends, waiting 10 seconds, and reconnecting. If detection returns, a stuck handshake was the cause. If not, proceed to step 4.
- Reset the OS display mode and graphics driver by cycling through available display modes and resetting the graphics driver. If the display now appears in display settings, enable it there. If still not detected, go to step 5.
- Perform a full power cycle: shut down the source, unplug the monitor and any intervening dock from power for 60 seconds, then reconnect power to the monitor first, then the source. If detection returns, a stale EDID cache or power‑state desync was the problem. If not detected, continue to step 6.
- Test the monitor with a different source (for example, another laptop or desktop). If the display is detected, the original source’s port, driver, or output mode is likely the issue. If not detected, the monitor itself may be faulty.
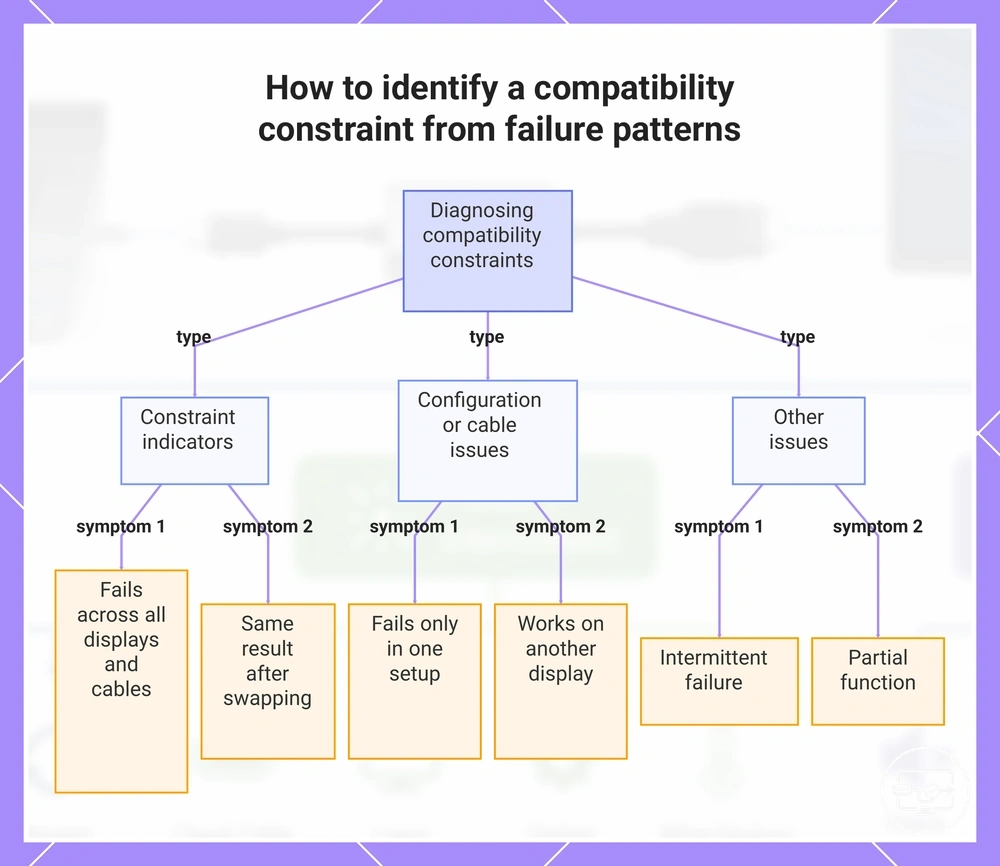
Symptom-to-cause patterns that point to a compatibility constraint
A compatibility constraint is a fixed limitation in hardware or protocol negotiation between a source device and a display adapter. When the same failure repeats across multiple tests with different cables and displays, the cause is likely a constraint rather than a configuration error. This distinction matters because a constraint signals a boundary that cannot be resolved by adjusting settings or swapping accessories.
A common myth is that trying another cable or display can fix any repeated failure. It is important to verify the pattern under varied conditions before concluding a constraint.
- Fails everywhere or never works on any display — consistent failure on multiple displays and cables → strong signal of a compatibility constraint; next step is to check the source device or adapter capability.
- Fails only in one setup — works on another display or with another cable → likely a configuration or cable issue, not a constraint.
- Works on another display — the source and adapter can function, so the original display may have a compatibility boundary.
- Same result with a different cable or display — eliminates that variable; points to source or adapter limitation.
- Intermittent failure — not a consistent outcome; may indicate a loose connection or power issue rather than a constraint.
- Partial function (e.g., video but no audio) — may indicate a protocol mismatch rather than a full constraint; test with another display to confirm.
This chart categorizes repeated failure patterns to help distinguish a hardware or protocol compatibility constraint from configuration or cable issues.
Signs the source device cannot output video over USB-C for this HDMI setup
A USB-C port that supports data transfer and charging only lacks video output capability, which directly prevents the source device from outputting video over USB-C for this HDMI setup.
Even with a known-good HDMI adapter and display, the connection may produce no signal. Because the port capability is a hardware limitation, persistent no-signal behavior across different displays often indicates that the port lacks the capability to output video.
- The external display shows 'no signal' despite being correctly connected. Test the same adapter and display with a source device known to support USB-C video output to confirm.
- The USB-C port charges the device and transfers data but does not display video — a clear capability separator between data/charging and video output. Check the device's specifications for DisplayPort Alt Mode or video output support.
- The adapter works on another source device but not on this one. This isolates the issue to the source port rather than the cable or display.
- The operating system does not detect an external display in display settings. Manually trigger 'detect display' in settings; if still no detection, the port likely lacks output capability.
- The physical connection feels firm but yields intermittent or no video. Test with a different HDMI cable and display to rule out other factors.
- Multiple displays show no signal when connected through the same adapter and cable. This reinforces that the source port is the limiting factor, especially if the adapter works with other devices.
A single port icon, such as a lightning bolt or DP symbol, is not definitive proof of video output capability. The manufacturer's specification is typically the reliable source to confirm whether a USB-C port supports display output.
Signs the display-side HDMI chain is the constraint through resolution, HDCP, or EDID behavior
When the display-side HDMI chain is the constraint, the output can fail even if the USB-C device and cable are fully capable. The issue typically originates in the sink — the TV or monitor — or the intermediate HDMI path, not in the source itself. These constraints typically appear as unexpected resolution limits, HDCP handshake failures, or display negotiation problems.
These symptoms often appear as a black screen or unstable output when playing protected content, or a lower resolution than expected. Identifying the constraint often involves checking the display’s HDMI port capabilities, HDCP version support, and the display negotiation (EDID) information it reports. In some cases, replacing the display or using an EDID emulator may resolve the issue.
- Output mode
- Can present as a resolution cap at 1080p when 4K is expected, indicating the sink does not negotiate the higher mode.
- Can present as flicker or instability when the output mode changes, often from a mismatch between the source timing and display capabilities.
- Can present as a refresh rate drop (e.g., 60 Hz instead of 144 Hz) when the HDMI chain does not support higher rates.
- Protected content
- Can present as a black screen when HDCP-protected content is played, even though non-protected content works normally.
- Can present as an intermittent blanking that occurs only during protected playback, suggesting HDCP re-authentication failures.
- Can present as an HDCP error message on the display or source, indicating the sink did not complete the handshake.
- Negotiation
- Can present as a display that is not detected at all, or detected after a long pause, pointing to EDID read failures.
- Can present as a prolonged black screen before an image appears, which may indicate repeated negotiation attempts.
- Can present as a correct resolution but no audio, when the display negotiation does not include the audio EDID block.
If the same USB-C device works on one display but not another, the constraint is likely on the sink side — the display or its HDMI input.
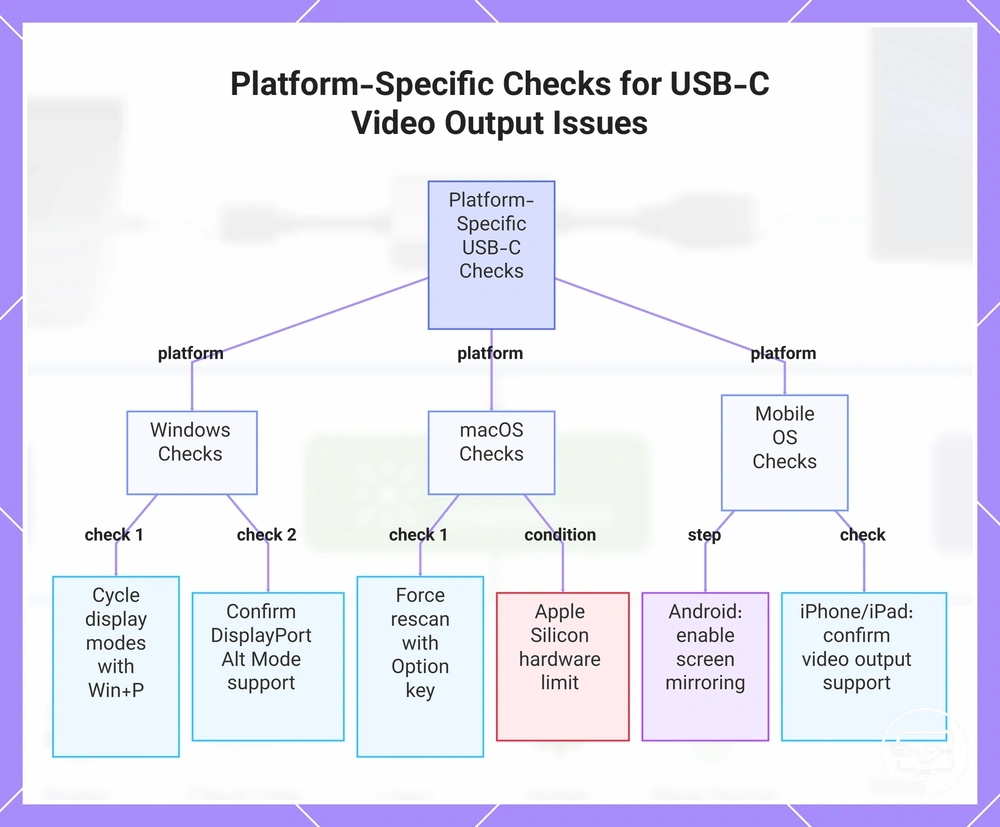
Platform-Specific Checks When the Symptom Route Does Not Resolve the Issue
USB-C video output handling differs across platforms due to variations in display management, driver stacks, and mobile video-out modes by OS and device model. Perform these checks only after basic hardware and chain checks.
Windows
Detection on Windows usually goes through the Display Settings panel and the graphics driver control panel.
- When the display is not detected, use Win+P to cycle through available display modes (e.g., Duplicate, Extend) and confirm that the USB-C port supports DisplayPort Alt Mode.
- If the output remains undetected, check that the display is selected as a detected display in Settings.
macOS
macOS typically detects external displays automatically.
- Open System Settings > Displays and look for the display name.
- Press the Option key while clicking the Detect Displays button to force a rescan.
On Apple Silicon Macs, the number of supported external displays depends on the chip model and available bandwidth, so undetected displays may reflect a hardware limit rather than a connection fault.
Android
Android video-out implementation varies; most devices require enabling screen mirroring or Desktop Mode from the notification panel after connecting the hub.
- Enable screen mirroring or Desktop Mode from the notification panel.
- If needed, set the USB configuration to a video-output mode in developer options.
Detection status is rarely shown explicitly. The device may not support DisplayPort Alt Mode over USB-C at the hardware level if the display remains undetected after trying these steps.
iPhone and iPad
iPhone and iPad models with USB-C video output rely on iOS or iPadOS to initiate mirroring or extended display mode.
- If the display is not detected after connecting an HDMI adapter, confirm that the device supports video output over USB-C.
- On supported iPads with Stage Manager, enable external display output in Control Center or Display Settings.
The device does not offer a dedicated detection tool; either the screen mirrors or remains blank.
This chart shows the key troubleshooting steps for USB-C video output on Windows, macOS, and mobile devices when basic checks fail.
Windows external display detection and driver-layer fixes for USB-C to HDMI
When Windows fails to detect a monitor connected through USB-C to HDMI, the problem is often the display mode setting, a stale detection state, or a graphics driver that needs resetting.
- Open Settings > System > Display and click Detect. If the monitor appears, go to step 2. If not, the system may not be detecting the display at the hardware level.
- Under Multiple displays, switch the current display mode (for example, from Extend to Duplicate or Second screen only) and then back. This forces Windows to renegotiate the output and can fix a stuck mode state.
- Open Device Manager (right-click the Start button), expand Display adapters, right-click your GPU driver, and select Update driver > Search automatically for drivers. If an update is found, install it and restart.
- If no update is available, right-click the GPU driver again, select Uninstall device (do not delete the driver), restart the computer while keeping the adapter and monitor connected, and let Windows reinstall the driver. After the restart, test detection again.
- In Device Manager, expand Universal Serial Bus controllers or USB Connector Managers, look for UCM-UCSI-ACPI Device, right-click it, and select Uninstall device (do not delete the driver). Shut down the computer, unplug the power adapter, and then power it back on. This resets the USB-C controller and often restores display negotiation.
If the monitor is connected through a docking station, docks can expose multiple outputs simultaneously. In that case, bypass the dock temporarily by connecting the monitor directly to the laptop USB-C port to isolate whether the issue is with the dock or the laptop.
macOS external display detection and HDMI audio routing checks for USB-C adapters
Check detection state, arrangement settings, and audio output device selection to verify macOS external display and HDMI audio routing.
- Disconnect and reconnect the USB-C adapter and cable to refresh the connection.
- Open system display settings and, if available, use the force detection option to refresh the display connection.
- If the external display is detected but shows no image, check the arrangement settings to confirm it is not mirroring a closed or inactive display.
- If video appears but there is no sound, open system sound settings and select the external display as the HDMI audio output device.
If the screen remains black when playing protected content, an HDCP handshake issue may be the cause.
Android and Samsung USB-C video output modes that can block HDMI output
USB-C to HDMI output may fail on some Android devices due to missing hardware support or an incorrect output mode.
Capability signals that can block HDMI output
- The phone's USB-C port typically needs DisplayPort or HDMI Alt Mode support. Without that support, video output is blocked.
- Video output is more common on flagship and upper-midrange devices, but lower-end models may lack the necessary hardware.
- A USB-C to HDMI adapter or cable is typically required. Without it, HDMI output is not possible.
- A simple cable or adapter may not work if the phone requires a powered hub for stable video signal. In that case, output may be blocked or intermittent.
Mode or state issues that block HDMI output
- Enabling a desktop mode (such as Samsung DeX) can block standard screen mirroring. Disabling it may restore output.
- The active display output mode (mirroring vs. extended desktop) may include a setting that blocks the desired behavior.
- Power delivery from the hub can change stability on mobile hubs. A powered hub may prevent intermittent dropouts.
iPhone and iPad connection limits that change what “USB-C to HDMI not working” means
The most common cause of a USB-C to HDMI connection not working on an iPhone or iPad is a device-side video output limitation. Many users assume any USB-C port supports video, but Apple's implementation varies by model and generation. Expecting standard behavior from a device without video output capability often results in a blank display.
To check video output support, look for DisplayPort Alt Mode in your device's specifications. Not every USB-C port on iPads or iPhones supports this mode.
- Confirm the USB-C to HDMI adapter or cable is designed for video output, not just charging.
- Make sure the HDMI input on your display or TV is working and set to the correct source.
- Check that your device has enough battery charge; low power can sometimes prevent external display output.
- Connect the adapter directly to the device instead of through a hub whenever possible.
- A device without video output capability will not display a picture, regardless of cable or adapter quality. A ‘not supported’ result can look exactly like ‘not working’.
Next-step actions after you isolate the failure layer
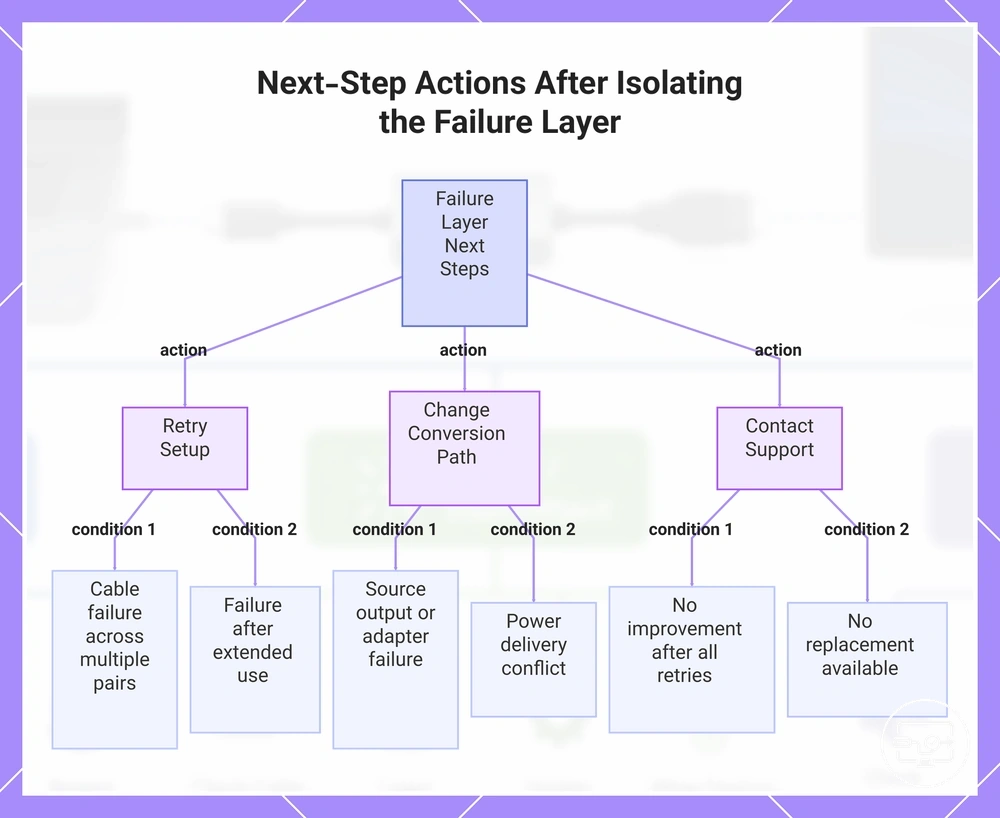
After isolating the failure layer, the next step depends on the evidence. You can retry the current setup after adjusting one variable, change the conversion path, or contact support with a completed evidence checklist.
- If the failure is isolated at the source output and repeats across multiple cables and displays, the next step is to change the conversion path.
- If the failure is isolated at the cable and the same cable fails on multiple source-device pairs, retry with a known working cable (retry setup).
- If the failure is isolated at the adapter and the specific adapter fails only with certain source-device pairs, change the conversion path.
- If the failure is isolated at the display input and the device works on other displays, change the settings (e.g., lower resolution) rather than change the path.
- If the failure appears only under specific conditions (e.g., after extended use), retry after cooling.
- If there is no change after retrying all known working combos and the failure persists across all configurations, contact support with the evidence checklist.
- If the failure is isolated but no replacement is available, contact support with the evidence checklist from the final section.
- If a power delivery conflict is suspected (USB-C negotiation issues), change the conversion path.
After selecting your path, apply these steps:
- Document the evidence that confirmed the failure layer and the decision.
- Apply the selected next action: retry the setup, change the conversion path, or contact support.
- Verify whether the expected improvement condition (e.g., stable signal, correct resolution) is met.
- If the failure persists, return to the decision block and select the next appropriate path.
This chart shows the recommended next actions after isolating the failure layer, with the specific conditions that trigger each action.
When to retry a clean setup path and when to change the solution type
Retry the clean setup when the observed outcome points to a configuration issue, and change the solution type when the evidence suggests a constraint in the conversion path itself.
Retry setup
- Observed outcome: Display appears after reseating the cable but fails again later. Likely constraint: Loose connection or handshake timing. Next action: Re-test with the same cable and port. Expected outcome difference: Stable signal if the original setup is clean.
- Observed outcome: No display when using a specific input port, but other ports work. Likely constraint: Port conflict or EDID issue. Next action: Retry the clean setup using a different input on the display. Expected outcome difference: Display appears if the original port was the only variable.
- Observed outcome: Intermittent screen flicker on a display that works with other sources. Likely constraint: Cable shielding or slight misalignment. Next action: Re-test the same cable after ensuring firm connections at both ends. Expected outcome difference: Flicker resolves if the connection was the cause.
- Observed outcome: Resolution is lower than expected (e.g., 1080p instead of 4K). Likely constraint: Cable bandwidth or adapter EDID negotiation. Next action: Retry the clean setup steps to ensure the adapter and cable are fully seated and the source is set to proper output. Expected outcome difference: Full resolution appears if the handshake completes correctly.
- Observed outcome: No audio, but video works. Likely constraint: Audio format misconfiguration. Next action: Re-test the same setup after toggling audio output settings on the source. Expected outcome difference: Audio returns if the setting was misaligned.
If these setup steps to retry yield no improvement, the constraint is likely structural rather than configurable.
Change solution type
- Observed outcome: No display at all after multiple retries with a known-good cable and display. Likely constraint: The adapter may not support the required video format or HDCP version. Next action: Switch the conversion path from an adapter to a direct cable (USB-C to HDMI) or from a hub to a single-purpose adapter. Expected outcome difference: Display appears if the conversion path now matches the signal requirements.
- Observed outcome: Display works at a low resolution but may not achieve the monitor's native resolution. Likely constraint: The current solution type (e.g., a passive adapter) may not handle the bandwidth. Next action: Switch the conversion path to an active adapter or a certified cable that supports the required data rate. Expected outcome difference: Native resolution becomes available.
- Observed outcome: Connection drops after a few minutes of use, but a different device works with the same cable and display. Likely constraint: The source device's USB-C port may not deliver enough power for the adapter or hub. Next action: Switch the conversion path to a powered hub or an adapter with an external power input. Expected outcome difference: Stable connection if power was the limiting factor.
- Observed outcome: Video works with one display but not another, despite both supporting HDMI. Likely constraint: The second display's EDID may not be readable through the current adapter type. Next action: Switch the conversion path to a newer adapter that implements EDID emulation or to a direct USB-C to HDMI cable. Expected outcome difference: Both displays work if the new path handles EDID correctly.
- Observed outcome: Intermittent audio/video sync issues only with certain content (e.g., 4K HDR). Likely constraint: The adapter or cable may not sustain the high bandwidth required. Next action: Switch the conversion path to a higher-spec cable or a certified hub that explicitly supports HDR passthrough. Expected outcome difference: Synchronization returns with demanding content.
As a confirmation test, try a different display and cable with the same source and adapter. If the problem persists, the constraint is likely with the conversion path itself, and retrying the original setup may not succeed.
What Evidence to Collect Before Contacting Support or Replacing Components
Gather evidence that defines the failure layer and shows whether the problem originates in the source device, adapter/hub, cable, or display, so you avoid repeated trial-and-error. This evidence helps support teams diagnose the issue faster without requiring additional logs.
- Device model and port type (USB-C, HDMI) — identifies hardware variation affecting compatibility.
- Exact symptom (no signal, flickering, resolution limited) — narrows possible causes.
- Setup order: device → adapter/hub → cable → display input → outcome — reveals where the chain breaks.
- Known-good swap test with a different cable or display — helps isolate whether the issue follows the component.
- Display input setting (HDMI 1, 2, etc.) and any changed settings — incorrect input selection mimics failure.
- OS version and driver state (driver detected, up to date) — software state often determines behavior.
- Result of each attempt (no detection, partial image) — pattern points to specific layer.
- Whether the issue reproduces on another device with the same adapter/hub — identifies adapter/hub as probable cause.
- Whether the issue reproduces on the same device with a different display — tests display-side dependency.
- Power state of devices and external power to adapter/hub — insufficient power can cause intermittent behavior.
The strongest evidence is a repeatable set of steps that produces a consistent result. Present this evidence in chain order from source device through converter to display so the support team can trace the failure layer.