
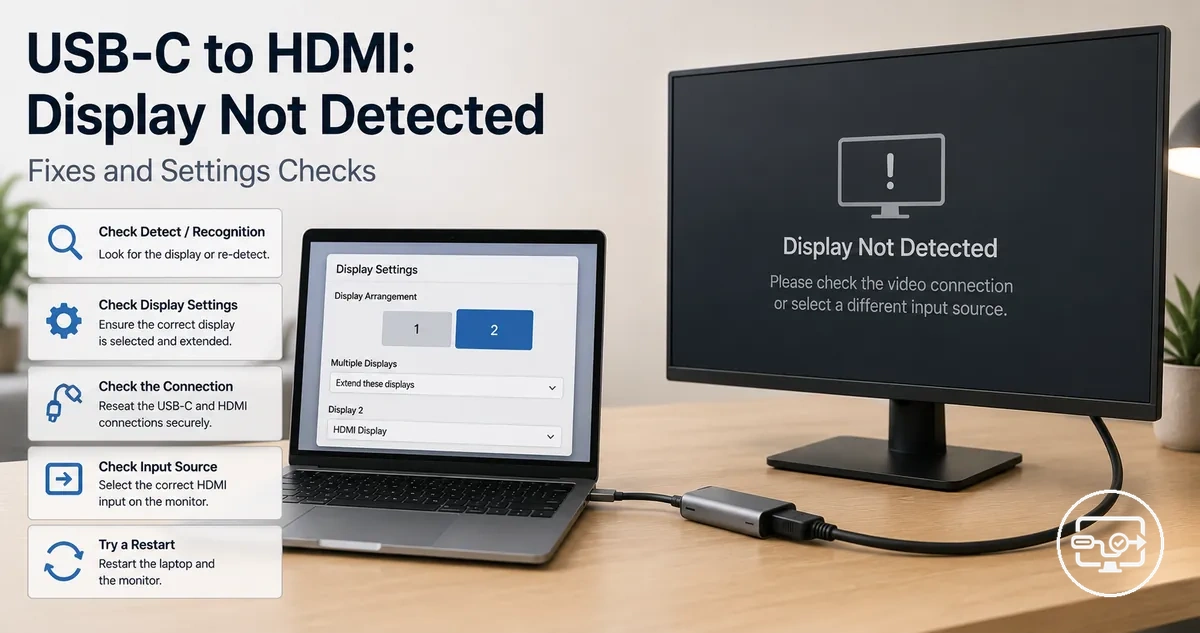
USB-C to HDMI Display Not Detected Troubleshooting
A USB-C to HDMI connection that results in a display not detected often points to root causes in the USB-C port, adapter, OS settings, or display input. The specific cause depends on device model and port capability.
These factors can be grouped into four common categories:
- The USB-C port may not support video output (DisplayPort Alt Mode).
- The adapter, hub, or dock may not provide proper conversion or be incompatible.
- OS display settings may be set to a mode that ignores the external display.
- The display’s input source may be set to a different port or type.
Starting with an isolation check—for example, testing the adapter on another device or the display with a different source—can narrow down the problem.
The distinction between 'display not detected' and 'no signal' is meaningful: the former means the system does not enumerate the display, while the latter often indicates a signal path issue after detection.
Common scenarios include a laptop connected through a USB-C hub that fails to recognize a second monitor, or a direct adapter that stops detecting a TV after an OS update. For a broader view of USB-C to HDMI compatibility, see the USB-C to HDMI Compatibility overview.
What “display not detected” means in a USB-C to HDMI connection
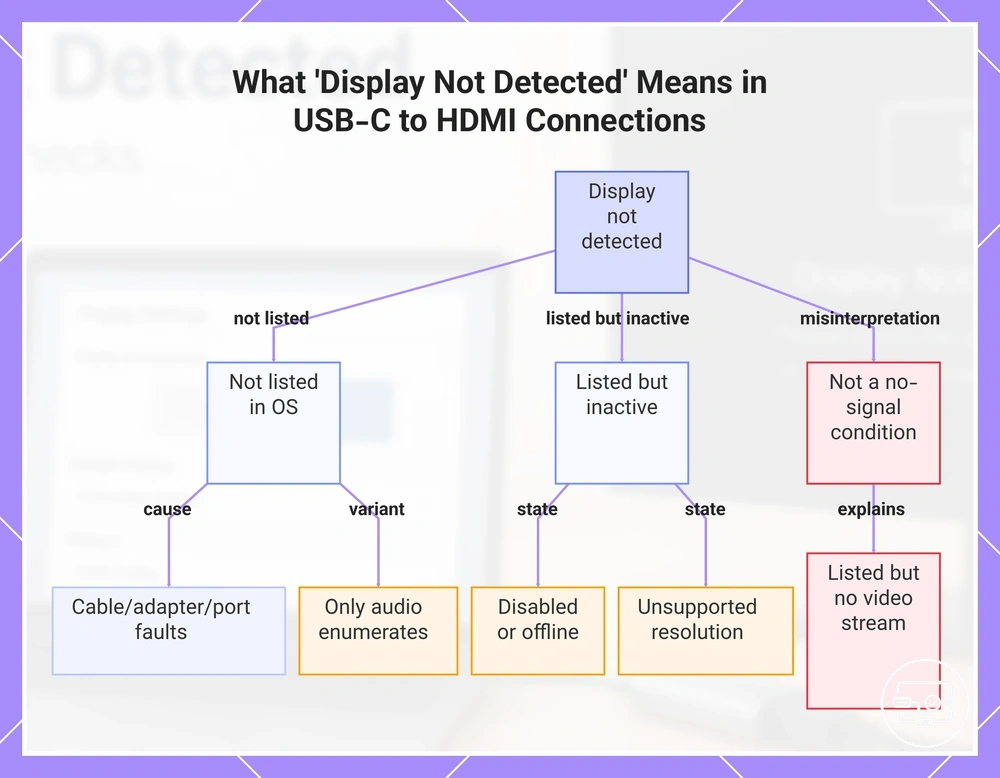
“Display not detected” is an enumeration state that occurs when the operating system does not list the external display in its display settings after the USB-C to HDMI connection is made. The critical distinction is whether the display appears in the OS display list or is not listed at all.
What “display not detected” means in a USB-C to HDMI connection:
- The display is not listed in OS display settings: the system did not detect the display; this often points to cable, adapter, or port-related issues.
- The display is listed but disabled or offline: the display appears but is not active as an extended or mirrored screen; how the OS handles this varies.
- The display is listed with an unsupported resolution or refresh rate: the monitor is recognized but may not display content correctly due to a mode mismatch.
- Only the HDMI audio device enumerates, without a video display: the connection carries audio but the video display is not recognized.
- Content-protected failures, such as HDCP handshake errors, can cause a different kind of detection issue.
This “display not detected” state should not be confused with a “no signal” or black screen condition, where the display is listed but receives no usable video stream. Recognizing which state you are in separates cable and enumeration problems from signal-output or settings issues.
This chart shows the different detection states and how to distinguish them from misinterpretations.
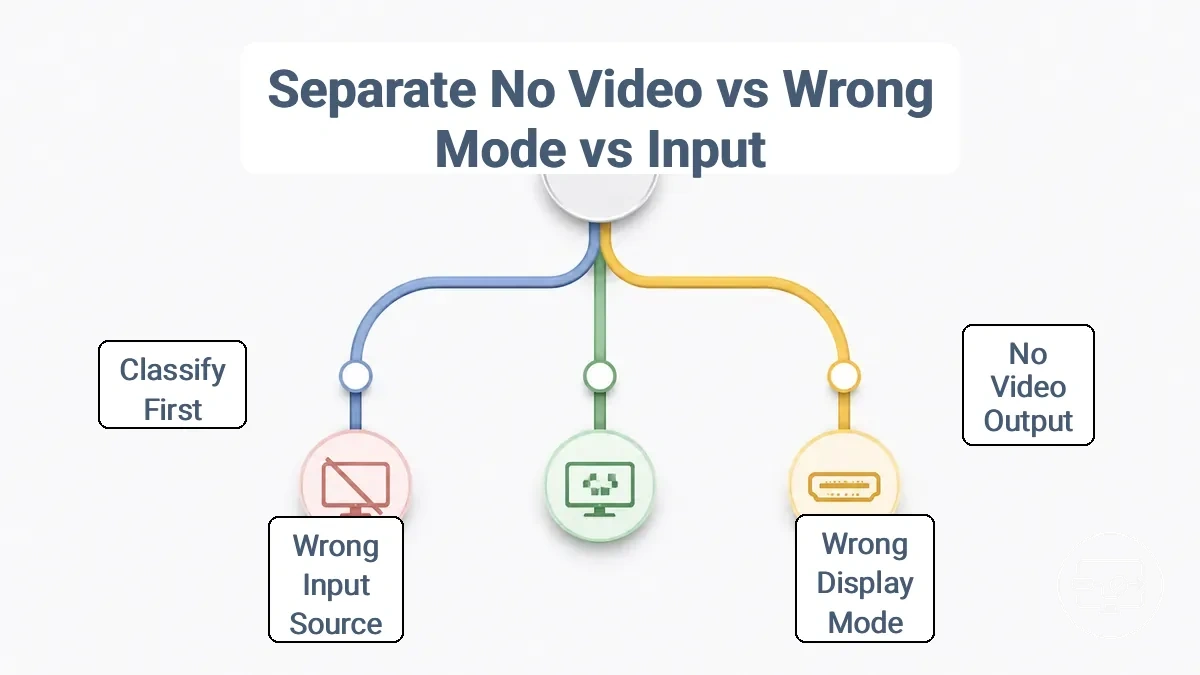
Separate the root issue: no video output vs wrong display mode vs wrong input
To classify a display failure, determine whether the computer is sending a signal (no video output), whether the output is directed to the wrong arrangement (wrong display mode), or whether the monitor is set to the wrong input source (wrong input source). Many display problems that show a “no signal” or “check cable” message fall into one of these three root buckets.
Classifying the issue first avoids wasted steps. Use the decision tree to separate the root issue—no video output vs wrong display mode vs wrong input. The image shows this three-bucket decision path for faster diagnosis.
- Symptom: Monitor shows “No Signal” and the connected TV or display says “No device”.
Check: Verify the USB-C port supports video output (often labeled with a DisplayPort icon or “DP Alt Mode”).
If yes: Likely cause is no video output from the source.
If no: Port may lack video capability; proceed to port verification steps later. - Symptom: The monitor is detected in system display settings but shows a black screen or duplicates content incorrectly.
Check: Toggle between “Duplicate” and “Extend” in display settings.
If Extend makes the external monitor appear, the previous mode was likely the issue — wrong display mode bucket.
If still black: Move to input source verification. - Symptom: “Second monitor not detected” message in system settings.
Check: Cycle through display modes (Duplicate, Extend, Second screen only) using the shortcut.
If the display appears during the cycle, the arrangement was likely incorrect — wrong display mode bucket.
If no change: Continue to port and connection checks. - Symptom: Monitor has power but shows “Check cable or input source” and the computer is on.
Check: Use the monitor’s on-screen menu to select the HDMI input you are using.
If the display appears after selecting the correct source, the cause was likely wrong input source.
If still blank: Proceed to hardware connection checks in the next section. - Symptom: “Extend display not working” despite the monitor being detected.
Check: Confirm the display arrangement is set to “Extend these displays” rather than “Duplicate” or “Second screen only”.
If Extend works after adjusting, it was likely wrong display mode bucket.
If not: Check the monitor's input source.
back to troubleshooting router
Fast isolation checks: ports, cables, adapters, and connection order
Run these fast isolation checks before assuming a compatibility problem. Stop as soon as the display appears.
The diagram below shows the correct physical chain—ports, cables, adapters, and connection order—and the most common points of failure to check in sequence. Each point can reveal a loose connection, a power issue, or a wrong input selection.
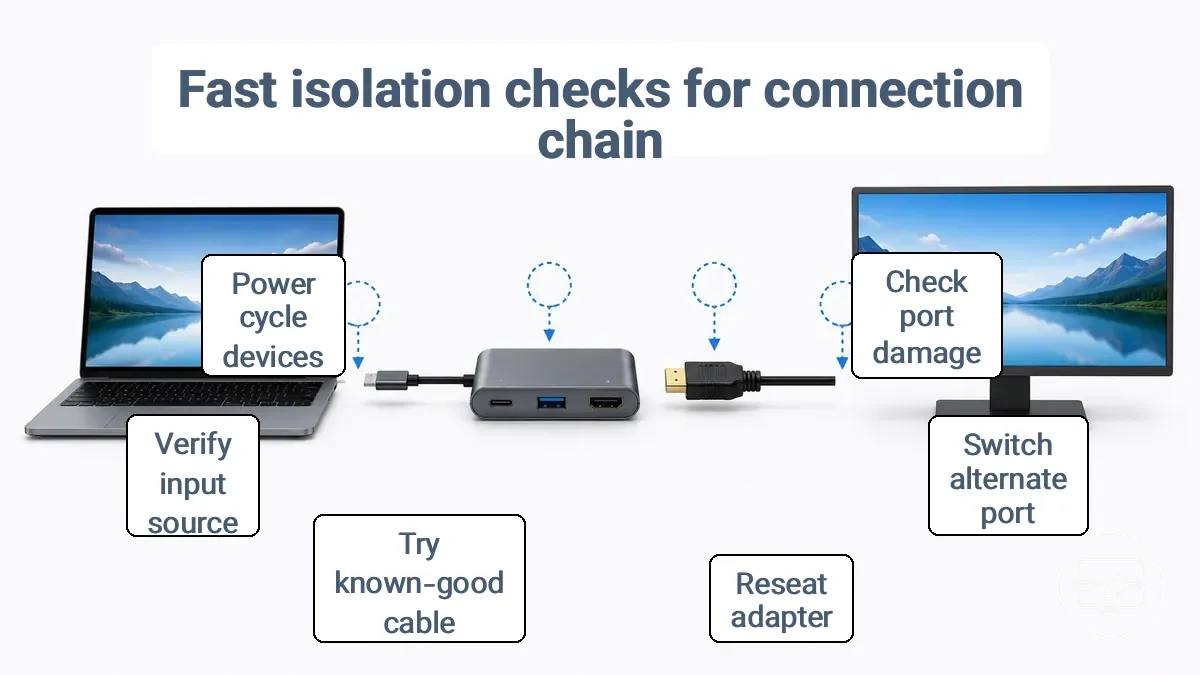
- Check the port you are using for visible damage or debris. (Re-check the display list after cleaning or switching ports.)
- If possible, switch to an alternate USB-C port on your laptop or device. (See if the display enumerates.)
- Inspect the adapter or hub: gently reseat it at the USB-C end and at the HDMI end if the cable is integrated. (Check display detection.)
- Try a known-good HDMI cable between the adapter and the display. (Look for a signal.)
- Verify that the display is set to the correct input source (HDMI 1, HDMI 2, etc.). (The screen may show the input label or a no-signal message.)
- Check the power supply for the adapter or hub. Some USB-C hubs require external power. (Replug the power and test.)
- Power cycle both the source device and the display: turn off, wait 30 seconds, restart. (Recheck the display list.)
- Test the adapter directly into the device without using a hub (if currently using a hub). (This isolates whether the hub is adding a failure point.)
- Verify the connection order: connect the USB-C end first, then the HDMI cable, then power on the display. (Some combinations require a specific order.)
- If an alternate adapter is available, swap the adapter. (Check detection immediately.)
If the display remains undetected after these checks, move on to setup steps and display mode for further troubleshooting.
Confirm the USB-C port supports external displays (DisplayPort Alt Mode / Thunderbolt)
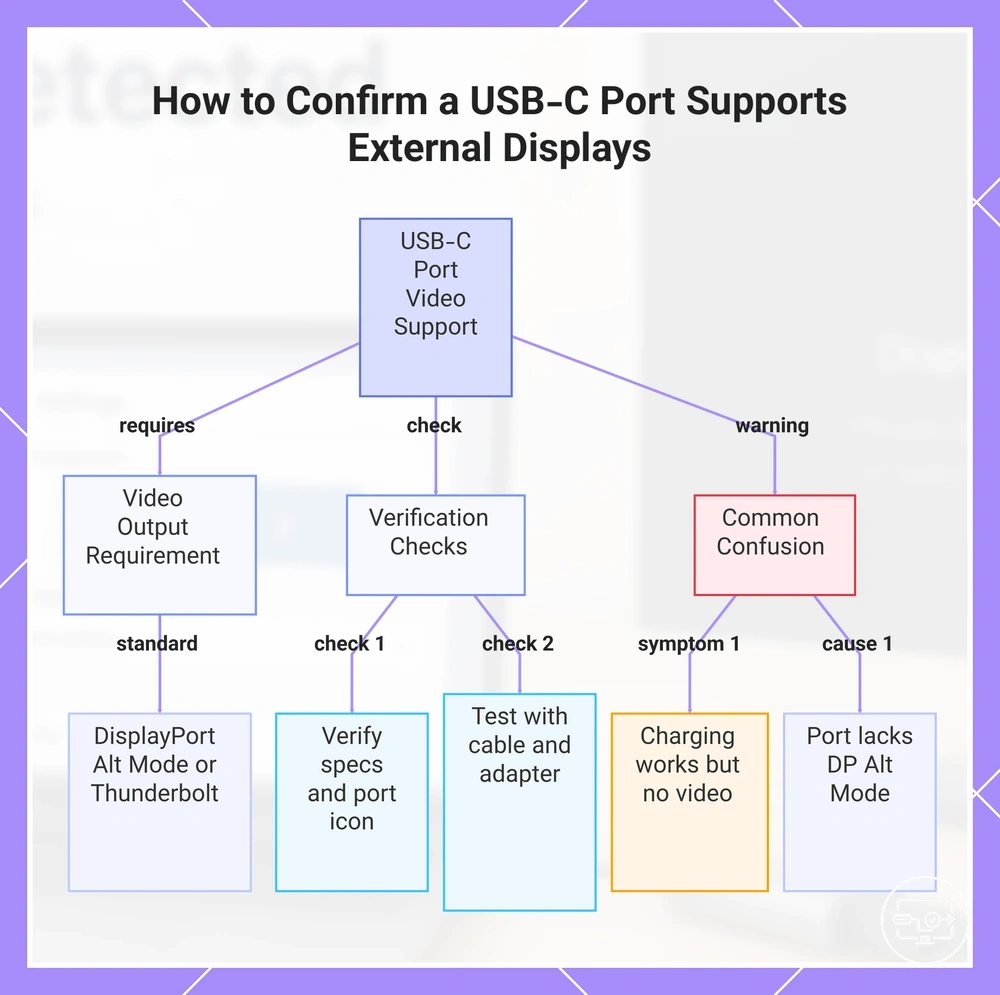
A USB-C port must support video output (typically via DisplayPort Alt Mode or Thunderbolt) to drive an external display. If the port does not support DP Alt Mode, it cannot send video signals; the shape alone does not guarantee compatibility.
Supporting external displays means the device can enumerate an external display when connected via a compatible cable. This capability is not universal across all USB-C ports—some are limited to charging or data transfer.
To confirm that a USB-C port supports external displays, use the following checks:
- Check the device’s official specifications for 'DisplayPort Alt Mode,' 'DP Alt Mode,' or 'Thunderbolt' video support.
- Some manufacturers mark video-capable ports with a DisplayPort-style icon (a D-shaped outline) or a thunderbolt lightning-bolt symbol next to the USB-C port.
- Review the manufacturer’s support page using the full model number—identical-looking ports may have different capabilities.
- Test with a known-good video-rated USB-C cable and a display that accepts USB-C input.
- Use a USB-C to DisplayPort or USB-C to HDMI adapter to see if the port outputs a video signal.
- Try the same cable and display on another device known to support USB-C video to confirm the test setup works.
A common point of confusion is when a USB-C port charges a laptop but does not show a picture on a monitor. This usually happens because the port supports Power Delivery (charging) but lacks DisplayPort Alt Mode or Thunderbolt video output. Such a port cannot drive an external display, even with the correct adapter.
For more details, see the compatibility checklist.
This chart shows the requirement, verification checks, and common confusion when checking if a USB-C port can drive an external display.
Hub, Dock, and Adapter Limitations That Prevent HDMI Detection
Different USB-C hubs, docks, and adapters present different HDMI paths to the operating system, and using the wrong type can prevent HDMI detection even when cables and ports are fully functional.
The OS may not enumerate the display through certain hubs. Their internal circuitry might lack video conversion support, require power delivery to complete the handshake, or contend for limited video lanes with other peripherals.
These path-level limitations lead to two common detection outcomes: the OS recognizes the hub but sees no display, or the hub itself is not enumerated at all.
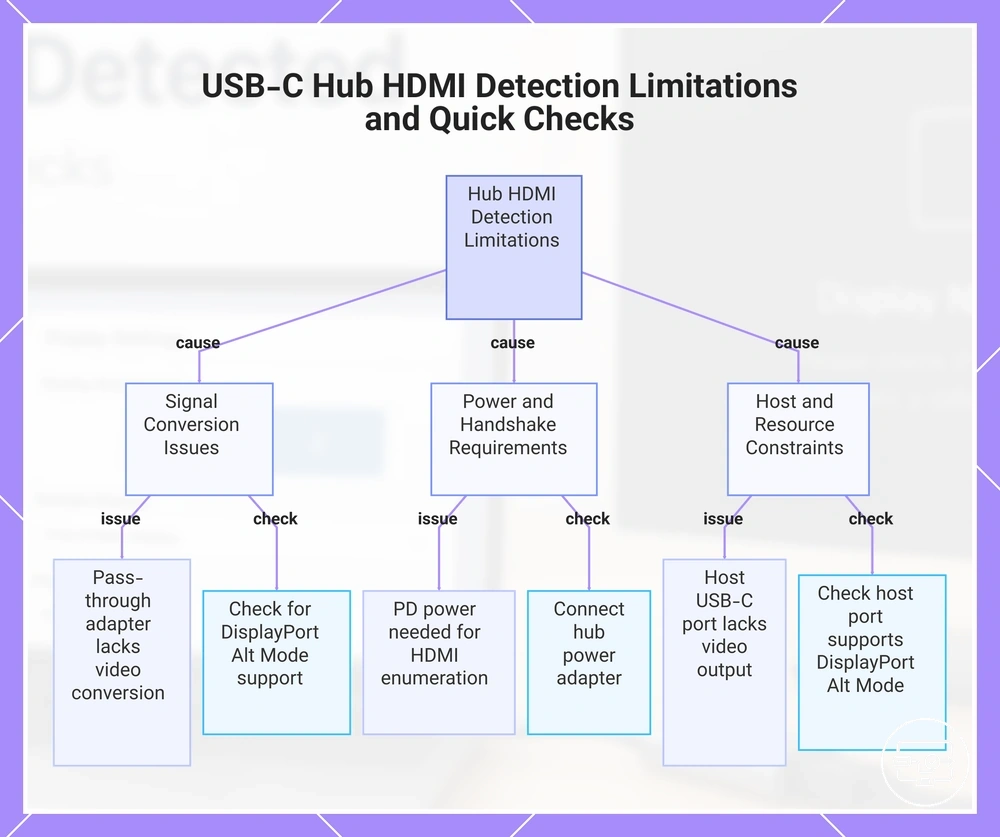
- Pass-through vs. conversion limitation: Some adapters only pass through USB data and do not convert the signal to HDMI. Symptom: the monitor is not detected even though the hub appears in the system. Quick check: verify that the adapter or hub explicitly supports video output (e.g., DisplayPort Alt Mode) and is not a data-only multiport adapter.
- Power delivery (PD) dependency: Certain hubs require external power to activate the HDMI port and complete the enumeration handshake. Symptom: connecting the hub without PD power can result in no display detection, and in some cases the hub itself fails to enumerate. Quick check: connect the hub’s power adapter, then reconnect the HDMI cable and monitor.
- Handshake and EDID negotiation failure: The hub’s internal hardware must successfully exchange EDID data with the monitor. A handshake failure due to timing or protocol incompatibility may prevent display detection. Symptom: the OS detects the hub but the monitor does not appear in display settings. Quick check: try a different monitor or use a direct HDMI connection to isolate a handshake issue.
- Multiport contention for video lanes: When multiple high-bandwidth peripherals are connected through the same hub, available video lanes may be insufficient for a stable handshake. Symptom: detection works with only the display attached, but fails when other devices (e.g., external storage, network) are connected. Quick check: disconnect all other peripherals from the hub and retest the HDMI connection.
- Incompatible HDMI version: A version mismatch between the hub’s HDMI output and the monitor’s input can prevent auto-negotiation. A version mismatch, such as HDMI 1.4 on the hub and HDMI 2.0 on the monitor, can prevent auto-negotiation. Symptom: no signal or sporadic detection. Quick check: verify the HDMI version supported by both the hub and the monitor.
- Hub dependency on host video support: Some hubs require the host USB-C port to support DisplayPort Alt Mode. If the port provides only data and charging, the hub cannot complete the HDMI handshake even if it is otherwise fully capable. Symptom: no display detected regardless of the hub or adapter used. Quick check: confirm that the host USB-C port supports video output (DisplayPort Alt Mode).
This chart shows common hub, dock, and adapter limitations that prevent HDMI detection, along with the corresponding quick checks to identify each issue.
Power-related fixes that restore detection (PD power, hard reset, replug cycles)
Power negotiation and device state can block enumeration even when compatibility is correct. After each step, re-check if the display is listed in your system display settings.
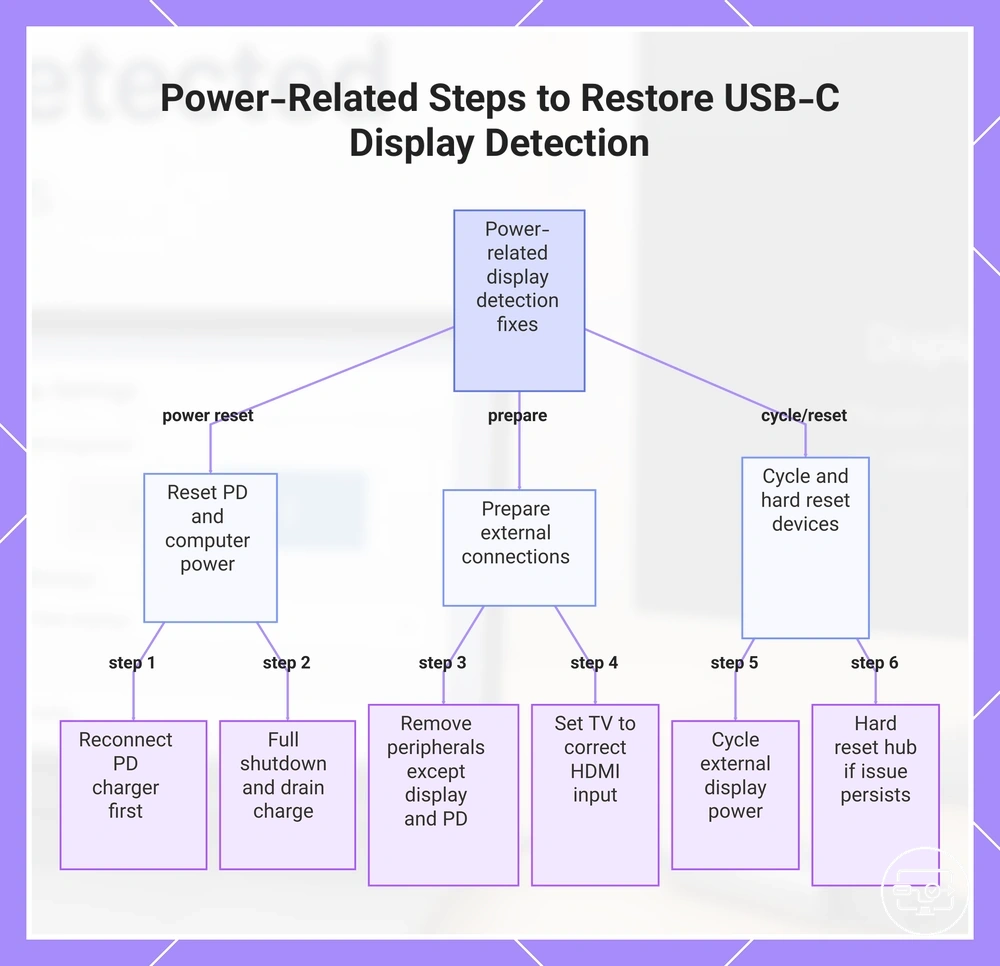
- Disconnect the USB-C hub or dock from the computer and unplug any PD charger from the hub. Wait several seconds, then reconnect the PD charger first, followed by the hub to the computer. This order may help re-establish power delivery negotiation. Then open display settings and look for the external display.
- Perform a cold restart (full shutdown) of the computer rather than a sleep restart. Unplug the power cord and hold the power button for several seconds to drain residual charge. Reconnect power and boot normally. After the system starts, check display settings.
- If using a hub or dock, remove all connected peripherals except the display and a PD charger. Replug the hub and connect the PD power source before connecting the USB-C cable to the computer. The hub may need power to enumerate ports. Then verify detection.
- For TV displays, ensure the TV is powered on and set to the correct HDMI input before reconnecting the USB-C cable. A mismatch in input source can prevent detection even after a power cycle. After selecting the correct input, check display settings.
- Cycle the power on the external display itself: turn it off, unplug its power cord, wait several seconds, then plug it back in and turn it on. Reconnect the USB-C cable and check if the display appears in system settings.
- If the issue persists, try a hard reset of the USB-C hub or dock by disconnecting all cables and, if the hub has a power button, pressing it for several seconds. Then reconnect power first and then the USB-C cable. Open display settings to confirm enumeration.
This chart shows the sequence of power-related actions to fix USB-C display detection issues, including PD power order, cold restart, peripheral removal, TV input check, display power cycle, and hub hard reset.
How to Fix Display Modes That Block External Monitor Recognition
When an external display is connected but remains dark, a mismatched display mode—such as extend, duplicate, or second screen only—may be hiding it. Before assuming a hardware fault, check if the monitor is listed in display settings but inactive.
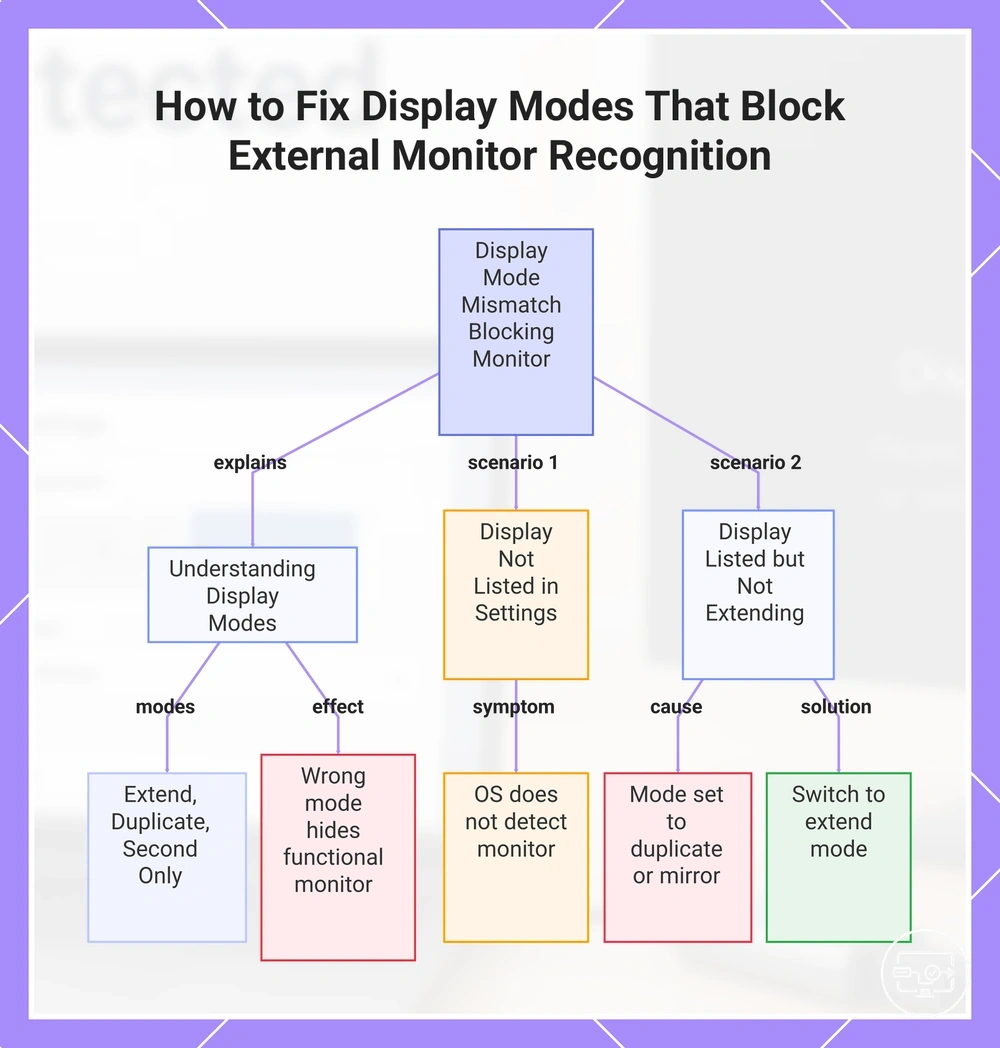
Extend creates a separate desktop on each screen, duplicate mirrors the same content on all connected displays, and second screen only switches output entirely to the external monitor. The wrong mode can cause a functional monitor to appear undetected.
Check these two scenarios to see if the display mode is blocking recognition. Windows and macOS subsections provide the detailed steps.
- Display not listed in settings – The operating system does not detect the monitor at all.
- Display listed but not extending – The monitor appears in display settings but its mode is set to duplicate, or the arrangement treats it as a mirror of the primary screen. Changing the mode to extend or adjusting the arrangement may resolve it.
Note that menu labels can vary by Windows version and graphics driver.
This chart shows the two scenarios where mismatched display modes prevent external monitor detection and how to resolve them.
Windows: detect displays, projection settings, and graphics output selection
If your second monitor is not detected, start by opening Windows display settings and clicking the Detect button, then check that the projection mode is set to Extend or Duplicate. If the screen appears in the list, ensure it is enabled.
If the second monitor is still not detected, use these steps:
- Press the Windows key + P and select Extend (or Duplicate) to set the active projection mode.
- Open Windows display settings by right-clicking the desktop and choosing Display settings.
- Under Multiple displays, click the Detect button (the exact label may vary by Windows version) to prompt Windows to scan for the second monitor.
- If the monitor appears but shows no signal, reseat the HDMI cable at both ends and confirm the monitor is powered on and set to the correct input source.
- If your system has more than one graphics output, ensure the monitor is connected to the dedicated GPU port; behavior may depend on system configuration.
If the second monitor still does not appear, use the following mapping to determine your next action:
- Not listed in settings: Try a different video port on the PC or restart the computer.
- Listed but disabled or showing low resolution: Select the display in Windows display settings, set it to Extend or Duplicate, and adjust the resolution to match the monitor’s recommended resolution.
macOS: display detection, mirroring, and display arrangement constraints
Open macOS display settings (the exact menu path varies by version) to check whether the external display is detected. Use the mirroring toggle or ‘Use as’ dropdown to select mirror or extend, then verify the arrangement.
- Detection check: Open Displays settings and look for the external display in the list. If it does not appear, try clicking “Detect Displays” (hold the Option key to see this option in some macOS versions) or reconnecting the cable.
- Mirroring or extend choice: Select the intended mode — “Mirror” duplicates the built-in screen; “Extend” (or “Use as separate display”) expands the workspace. The exact label depends on the macOS version.
- Arrangement adjustment: In the arrangement pane, drag the display icons so the second screen sits logically next to the primary display. Avoid overlapping positions, which can hide content.
Several macOS-specific factors can create a false detection failure:
- Permissions: Some macOS versions require Screen Recording or Accessibility permissions for certain adapters or apps that manage displays.
- Dock or hub power: Low-power docks or cables may fail to supply enough signal, causing intermittent detection.
- Display asleep: The external monitor may be in power-saving mode; pressing its power button or waking it via the Mac can restore detection.
- Input selection: On monitors with multiple inputs, verify the active HDMI or DisplayPort source matches the cable connected to the Mac.
- TV HDMI settings: If using a TV, check its HDMI mode or label setting (e.g., “HDMI auto”); some TVs require manual input assignment before macOS sees the display.
When the adapter is recognized but the HDMI display still isn't detected
When the adapter is recognized but the display is not listed, the problem is typically a display-side handshake or input mismatch rather than a total connection failure. A swap-based checklist helps isolate whether the issue lies in the cable, the display, the adapter path, or the source device.
- Alternate HDMI cable – Swap the cable with a known-good one to rule out a faulty or incompatible cable that may interrupt the handshake.
- Alternate display – Connect the same adapter and cable to a different monitor or TV that you know works via HDMI. If the alternate display is detected, the original monitor’s input or EDID handling may be the cause.
- Known-good source – Connect the monitor directly to a laptop or another computer using the same HDMI cable (without the adapter). If the display is detected, the adapter or the original computer’s output is likely the variable.
- Manual input selection – Use the monitor’s on-screen display to manually choose the HDMI input. Many monitors do not auto-detect and may remain on a different input even when a signal is present.
- Alternate port or adapter path – If your adapter is part of a hub, try a different HDMI port on the hub, or connect the adapter to a different USB-C or Thunderbolt port on your computer. Some hubs require external power for stable HDMI output.
- Power cycle both devices – Turn off the monitor and computer, unplug them for 30 seconds, then restart. This can reset the HDMI handshake and clear temporary handshake mismatches.
- Graphics driver update – Outdated or corrupted graphics drivers can prevent the system from enumerating a display even when the adapter hardware is recognized. Update the driver from the GPU manufacturer’s site, then test again.
Display-side settings and behaviors that stop detection (monitor vs TV inputs)
When a display shows “not detected,” the cause is often the display not switching to the correct input or not advertising the expected handshake behavior. Confirm the correct HDMI input is selected on the display.
On a monitor, input selection uses the OSD menu; on a TV, it requires navigating TV settings and may involve features like auto-switch or HDMI mode. Auto-switch, when enabled, can cause the TV to change inputs unexpectedly, which may interfere with detection. The checklist addresses these display-side behaviors.
- Select the correct input source (HDMI port) on the display using the monitor OSD or TV settings menu.
- Try a different HDMI port on the display, as some ports (e.g., HDMI 2 vs. HDMI 1) may behave differently on certain TVs.
- Disable or adjust the auto-switch feature in TV settings if the TV keeps changing inputs on its own.
- Check for an HDMI mode setting (if available on your TV model) and set it to a compatible mode.
- Power cycle the display: turn it off, unplug it for about 30 seconds, plug it back in, and select the correct input again.
Note that menu names and available options may vary by TV or monitor model.
When to change the solution type for stable detection
If detection keeps failing even after verifying port capability and clean setup, it often means the solution type does not match the context. Only switch the connection method after confirming port capability.
Choosing between a direct adapter and a hub or dock involves trade-offs in port power, hub complexity, and conversion path. A direct adapter with a simpler conversion path often provides more stable detection, but only if the source port delivers enough power and signal integrity.
Use these decision signals to change the solution type for stable detection:
- Scenario: single display, known compatible source, no extra peripherals needed. Constraint: limited port power. Suggested direction: use a direct adapter with a shorter, simpler path.
- Scenario: multiple displays or USB devices required alongside HDMI. Constraint: hub power budget may be insufficient for all ports. Suggested direction: try a powered hub or dock that supplies its own power.
- Scenario: intermittent detection that works after reconnecting. Constraint: the current hub or dock may be renegotiating the link. Suggested direction: switch to a direct adapter to reduce negotiation steps.
- Scenario: display never detected despite confirmed port capability. Constraint: the conversion method (e.g., DisplayPort Alt Mode vs. different internal mapping) may not match. Suggested direction: test a different conversion approach, such as an adapter that uses a different chipset or protocol handling.
Works intermittently often points to power or negotiation instability, favoring a direct adapter. Never detected more often signals a protocol or conversion incompatibility, requiring a different solution type entirely. If symptoms persist or differ from these patterns, back to troubleshooting router.