USB-C to HDMI No Audio: Compatibility Checks and Output Fixes
USB-C to HDMI no audio issues typically fall into two categories: HDMI audio device not detected by the operating system, or HDMI audio device detected but silent. Video working does not mean audio routing is correct, so separating the two is essential before attempting any fix. Start by determining which scenario you are facing.
- Check the signal path: the source device's USB-C port needs to support DisplayPort Alt Mode or Thunderbolt for audio and video, the adapter or hub must work with both the source and the display, and the HDMI cable must be fully seated.
- Once the path is confirmed, verify that the operating system has selected the correct audio output device.
- Examine the TV or receiver settings—input source, audio mode, and any ARC/eARC configuration—since these can override the incoming HDMI audio.
- Consider driver or firmware updates only after these checks.
The likely cause depends on the setup. On a laptop or desktop, the USB-C port may not support audio output depending on its design and whether it connects to a discrete graphics or audio controller. When using a hub or dock, the ability to pass HDMI audio can vary by hub chipset and power delivery. In a TV chain with a receiver or soundbar, audio routing (such as ARC or optical) may override the HDMI signal unless the correct input and format are selected.
How HDMI audio works in a USB-C to HDMI connection and where it usually breaks
HDMI audio over a USB-C to HDMI connection works only when the operating system detects the display or receiver as an audio endpoint and routes audio to it. If the endpoint is not enumerated or the system sends audio to internal speakers, no sound reaches the external display.
The end-to-end chain starts at the source device, where the audio output settings determine which playback device receives the signal. The audio stream passes through the adapter, hub, or dock, which negotiates the correct audio format and HDCP state over the HDMI link before the TV or receiver processes the incoming audio and routes it to its speakers or connected audio system. Breakpoints can occur at any link in this chain. Working video does not guarantee audio routing—missing audio despite video indicates a routing or endpoint issue that is part of the broader USB-C to HDMI Compatibility overview.
The diagram shows where HDMI audio typically breaks in a USB-C to HDMI chain: from the source operating system through the adapter or hub and into the TV or receiver.
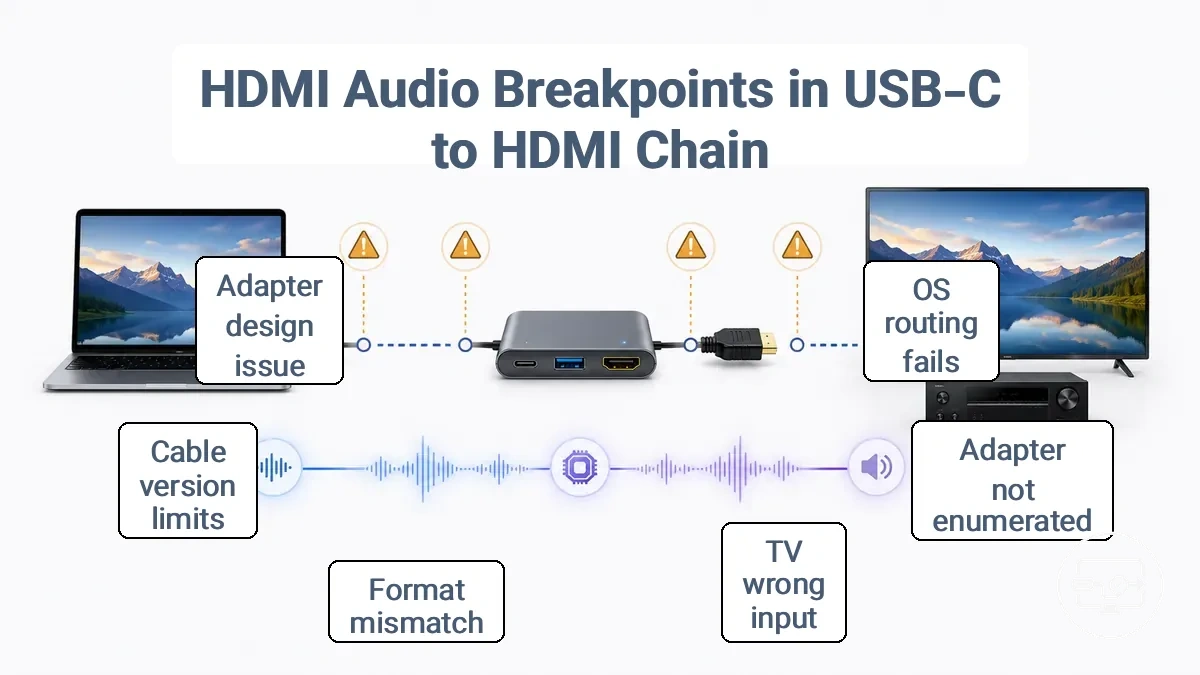
- Source OS does not list the HDMI connection as an available audio device or fails to route audio to it.
- Adapter, hub, or dock fails to enumerate the HDMI audio endpoint, preventing OS detection.
- TV or receiver is set to the wrong input, has ARC/eARC routing disabled, or is muted.
- Audio format mismatch: the source sends a codec (e.g., Dolby Digital or multichannel PCM) that the display or receiver does not support.
- HDMI cable or adapter version may limit audio channel count or sample rate, leading to dropouts or silence.
- Certain adapters pass video reliably but do not carry audio at all, depending on their hardware design.
Common confusion: “Video appears but sound stays on laptop speakers” vs “HDMI device never appears in audio output settings.” The first suggests the system is not routing audio to the endpoint; the second indicates the endpoint was never enumerated.
The next subsection outlines two diagnostic paths to isolate whether the breakpoint lies in OS routing or the adapter-to-display chain.
Audio transport path from source device to display or AVR
The audio transport path from a USB-C source to a display or AVR involves a complete chain where each hop exposes the necessary audio endpoint.
- USB-C port/controller The system must detect the connected adapter as an audio-capable USB device. If the endpoint is not exposed, the chain stops here; the OS cannot route audio.
- Adapter, hub, or dock The intermediate device bridges the USB-C signal to HDMI and presents an audio output to the OS. Detection of this endpoint determines whether audio can proceed to the next hop.
- HDMI cable and link The HDMI connection carries both video and audio. The cable and the HDMI link between adapter and endpoint must maintain a valid handshake for audio to pass.
- TV, monitor, or receiver/AVR The final device needs to accept the HDMI audio stream and expose it as a playback endpoint. If the display or AVR recognizes the audio format, the OS can route sound to it.
Two common situations: HDMI audio device missing vs selected but silent
HDMI audio problems fall into two situations: the playback device is missing from the sound panel, or it is present but silent. Pick the matching branch.
- Not detected: The HDMI audio device is not detected in the playback devices. This usually indicates a driver or firmware problem, often involving the GPU driver or the HDMI physical layer.
- Detected but silent: The HDMI audio device appears as a selected output but no sound is routed. This usually indicates a setting, format, or TV/dock chain issue, such as a muted output, mismatched audio format, or handshake failure. If your primary symptom is not audio-only, back to troubleshooting router.
Don’t keep toggling volume if HDMI isn’t listed.
Confirm the Adapter, Hub, or Dock Actually Supports HDMI Audio in Your Setup Path
Confirm that your adapter, hub, or dock supports HDMI audio and exposes a detectable audio endpoint. If audio does not appear in your system's sound output list, the hardware path may be the issue rather than OS settings.
The following checklist helps confirm that your adapter, hub, or dock supports HDMI audio in your setup path.
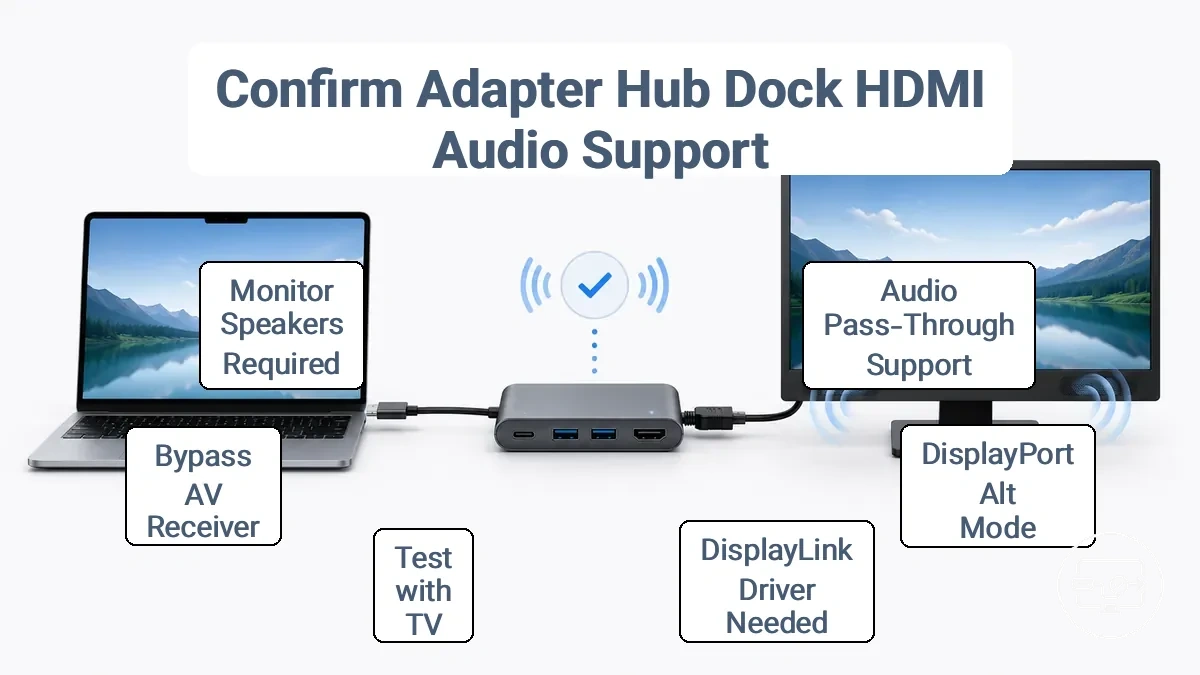
- Confirm that your adapter, hub, or dock is specifically marketed as supporting HDMI audio pass-through. If the product page only mentions video, audio support may be absent.
- Check that the USB-C port on your laptop supports DisplayPort Alternate Mode (DP Alt Mode). Without it, a passive adapter may not transmit HDMI audio.
- For hubs or docks using a DisplayLink chipset, install the latest DisplayLink driver and verify that an HDMI audio device (often labeled 'DisplayLink Audio') appears in your OS sound settings.
- Test the hub or dock directly to a TV rather than a computer monitor. TVs almost always accept HDMI audio, so if audio works on the TV, the issue is likely with the monitor's capabilities.
- Swap the HDMI cable and try a different HDMI input port on the display. Damaged cables or incompatible ports can prevent audio from reaching the endpoint.
- Bypass any AV receiver or soundbar in the signal path by connecting the hub/dock directly to the display. If audio appears when the receiver or soundbar is removed, that device is acting as the HDMI audio endpoint.
- Confirm that your monitor has built-in speakers or an audio output (e.g., 3.5mm jack). Many monitors are video-only and provide no way to hear audio even if the HDMI signal includes it.
- Open your operating system sound settings with the hub/dock connected and look for an HDMI audio device. If no new device appears, the hub/dock is not exposing an endpoint.
When using an AV receiver or soundbar in the signal chain, these devices can act as the HDMI audio endpoint, taking over the audio stream and preventing the monitor from receiving audio. The detected audio device is then often the receiver or soundbar, not the monitor.
Adapter and hub limitations that prevent HDMI audio output
A limitation in USB-C adapters and hubs is a design or specification boundary that can block audio from routing to the intended output even when video passes through, because HDMI video typically needs a simpler handshake or is more widely supported, while audio routing depends on internal switching logic that may not expose the correct audio endpoint.
Common limitation patterns include:
- Virtual display and dock routing: When a hub creates a virtual display adapter, audio may be routed through that virtual device instead of the physical HDMI output, leaving no sound on the external display.
- Endpoint not exposed: Some hubs detect an HDMI connection but do not register an audio endpoint in the operating system, causing the device to appear as a display-only output. This can happen when the hub’s firmware does not declare audio support over the USB-C Alt Mode.
- Multi-device routing conflicts: Connecting multiple audio-capable devices (e.g., HDMI monitor and USB headphones) can cause the hub to prioritise one output over another, often defaulting to the last connected device or none. Audio may be detected on one device but not the other, depending on the connection order.
- Power and state quirks: Low power delivery or transient states during hot-plug events can cause the hub to fail to initialise the audio channel; re-plugging or power-cycling may temporarily resolve this, but the hub may not reliably expose the audio endpoint under all power conditions.
- Receiver chain endpoint shifts: When an external audio receiver or soundbar is connected through the hub, the audio endpoint may shift to that receiver, bypassing the TV speakers, as the hub may not allow explicit selection of which audio output to use.
Some limitations cannot be fixed with software adjustments alone and may need a different setup path, such as using a separate USB audio adapter or a hub designed for simultaneous independent audio and video output.
Display and receiver chains that change where audio must be routed
When a laptop routes audio through a TV to a soundbar, the endpoint device depends on the chain arrangement. Input settings can override this expected route—checking TV and projector settings helps confirm where audio is being sent. Each chain type determines the endpoint and how audio is routed.
- Direct TV speakers: endpoint is the TV; audio is routed to its internal speakers; select TV as the playback device.
- TV to soundbar via ARC/eARC: endpoint is the soundbar; audio is routed through the HDMI ARC/eARC connection; select soundbar as the playback device.
- Laptop to AVR to TV: endpoint is the receiver or AVR; audio is routed through the HDMI input to the receiver; select the receiver as the playback device.
If the TV is set to external audio, TV speakers may stay silent even when audio reaches the TV.
Fix the output device selection when HDMI audio isn't the active playback path
Select the HDMI device as the active audio output to move sound to the display. The following steps guide you through selecting the correct output and verifying it.
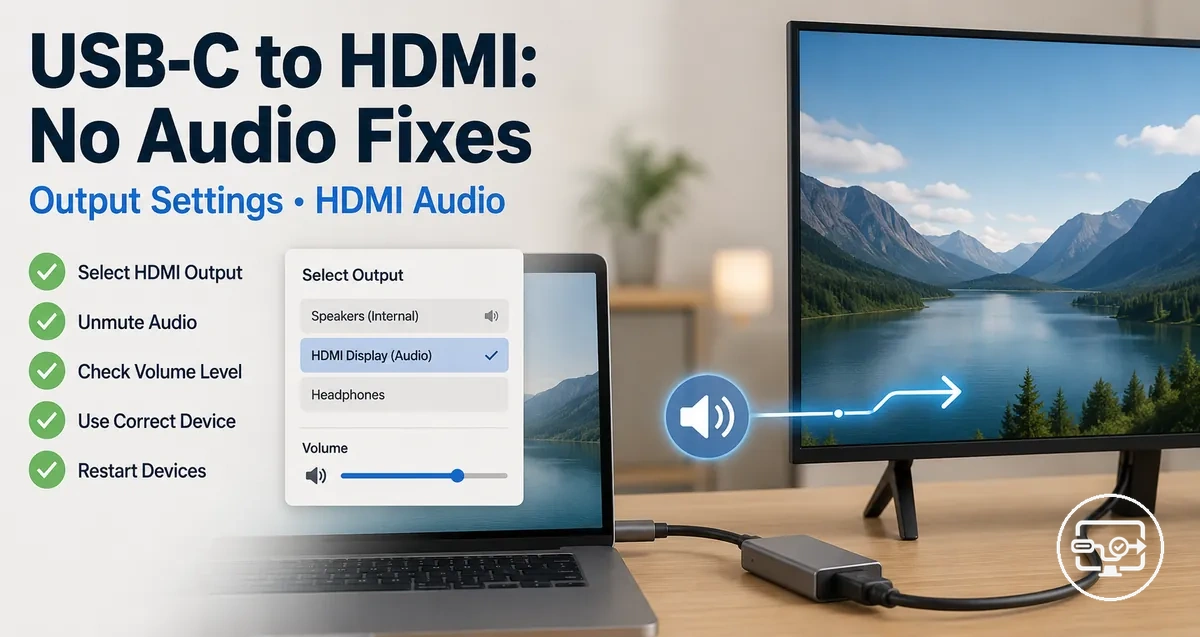
The illustration shows a typical location for HDMI audio output selection. Menu labels vary, but the selection method is similar.
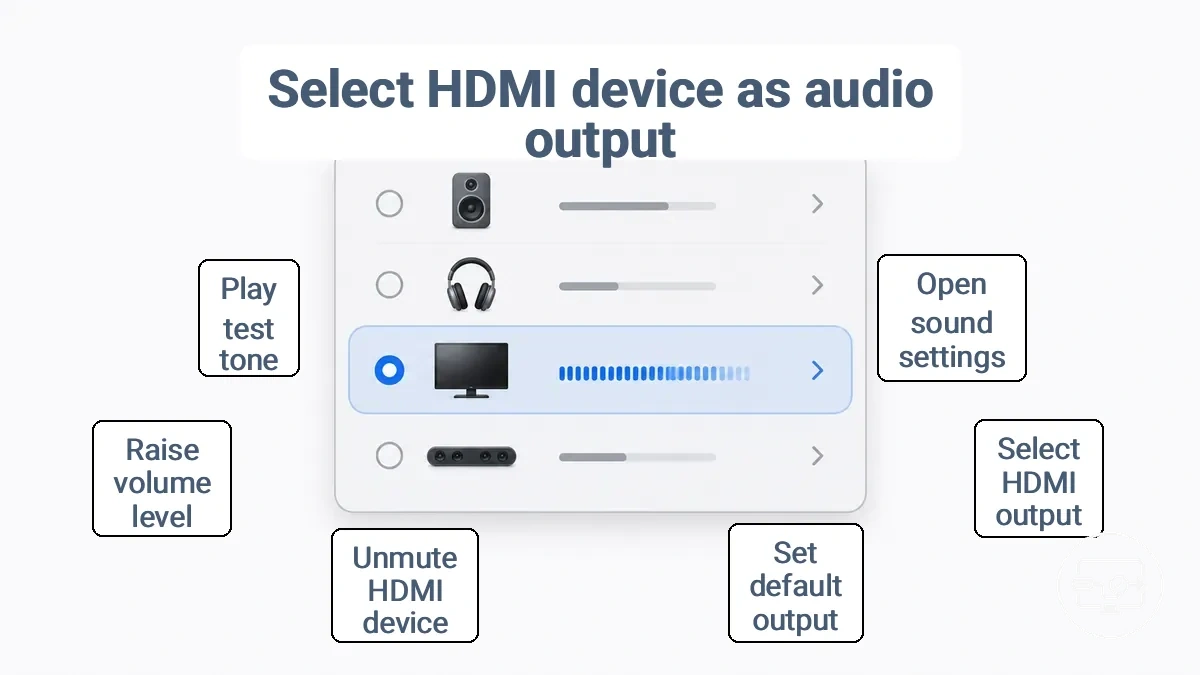
- Open the audio output settings from the system sound area.
- Look for the HDMI device in the list of available outputs; it may appear under a name matching your display or as “HDMI Audio”.
- Select that device and set it as the default output where the option is available.
- Check that the device is not muted and raise its volume level.
- Play a test tone or start a video application to confirm sound reaches the display.
- If the HDMI device does not appear, disconnect and reconnect the HDMI cable to re-enumerate the audio endpoint, and follow proper setup steps and output selection during reconnection.
- Verify that the device name shown in the audio settings corresponds to the connected display rather than an internal speaker.
Fast check: If sound stays on laptop speakers, the HDMI output isn’t selected. If HDMI isn’t listed, go back to the path checklist.
Windows: set HDMI as the default playback device and restore detection
Set HDMI as the default playback device by enabling it in the Windows Sound Control Panel and setting it as default. When successful, the HDMI device appears and plays audio through your TV or monitor.
- Open the Sound Control Panel: right-click the speaker icon in the taskbar, select 'Sounds', then go to the 'Playback' tab.
- Right-click in the blank area of the Playback tab and enable both 'Show Disabled Devices' and 'Show Disconnected Devices' to reveal any hidden HDMI outputs.
- If an HDMI device appears (often labeled 'HDMI Output', 'Digital Audio (HDMI)', or your TV/monitor name), right-click it, choose 'Properties', under 'Device usage' select 'Use this device (enable)', then click OK.
- Back on the Playback tab, right-click the enabled HDMI device and select 'Set as Default Device'. Confirm with Apply and OK.
- Select the HDMI device and click 'Configure' (or right-click and choose 'Test') to verify audio. A test tone confirms the device is working. If no sound, check that the TV is set to the correct HDMI input.
- If the HDMI device still does not appear after these steps, restart your PC with the HDMI cable connected and the TV powered on. This can force Windows to re‑detect the audio endpoint.
Labels may differ by Windows version, but the process is the same. If the device shows as 'not plugged in' after enabling, restarting or reconnecting the HDMI cable usually resolves the state.
macOS: choose the correct output device for the external display
In macOS Sound settings, select the correct output device to route audio to an HDMI or display output.
- Check that the volume is unmuted and set to an audible level.
- Play a test tone or audio file to confirm the output device is receiving sound.
- If no audio is heard, disconnect and reconnect the display cable to refresh the device list.
A monitor may list itself as an output device even without built-in speakers; selecting it typically produces no sound.
Linux and ChromeOS: Basic Output Routing Checks for HDMI Audio
Open the audio settings panel, select the HDMI sink, and verify the output profile is set to an HDMI-compatible mode.
- Check the output device list in the audio settings panel (often labeled “Sound” or “Audio”). The active HDMI sink is usually visible; if only HDMI outputs appear, internal speakers are not selected.
- Check the profile or port state for the HDMI output. Some audio panels allow switching between “Analog Stereo” and “HDMI” profiles. Selecting a different profile may activate the internal speakers.
- Confirm the HDMI sink is not muted and its volume is raised. A muted or zero-volume output produces no sound even when the correct sink is chosen.
- Restart the audio service or reconnect the audio device if changes do not take effect. A logout or restart may apply the new routing.
When HDMI shows up but stays silent: mute states, format mismatches, and exclusive mode
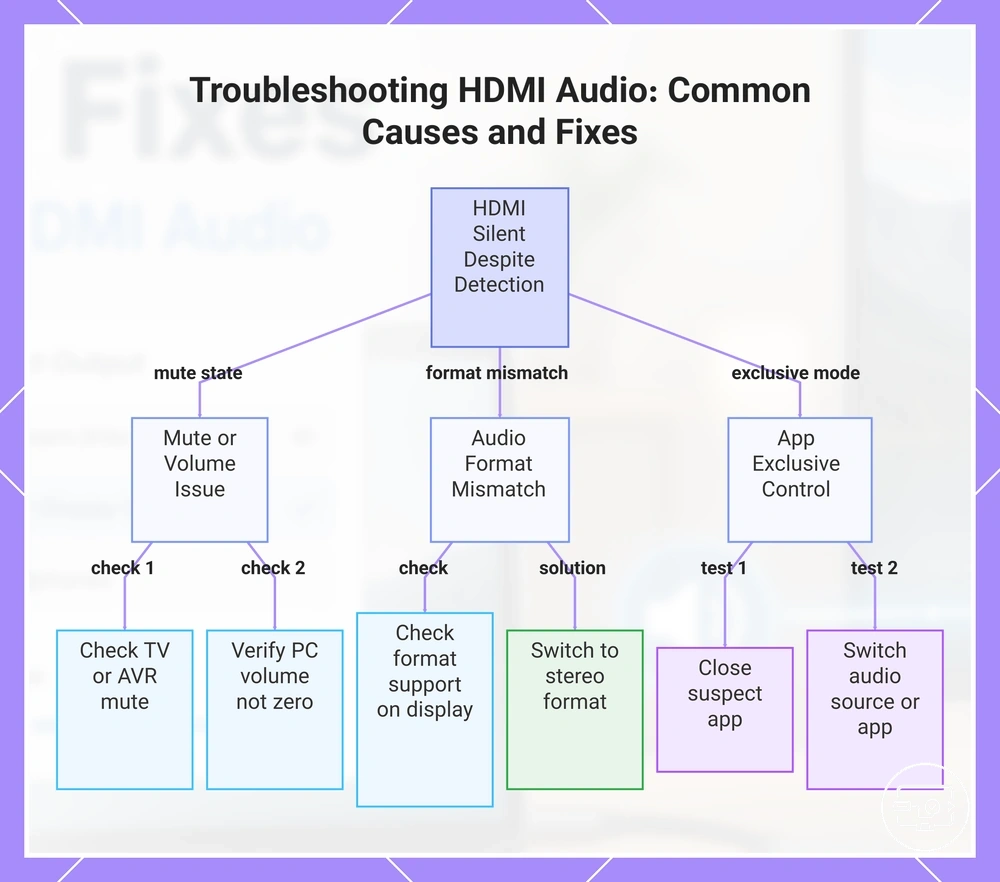
When HDMI is detected as a playback device but no sound comes through, the cause is often a muted output, a mismatch in audio format between the source and display, or an application holding the device in exclusive mode. The video shows correctly because it uses a separate path, but the audio path can be blocked by several common settings.
- Mute/Volume — Check that the TV or AVR is not muted and its volume is turned up. Some displays have an internal mute for specific HDMI inputs. On the PC side, verify the HDMI output volume in the sound mixer is not set to zero; the audio level bars may move while no sound plays if the output is muted at the display.
- Format — The audio format (sample rate and channel count) sent by the PC must be supported by the display or AVR. For example, when the PC sends a multi-channel surround format but the TV only handles stereo, the display may reject the signal and produce silence. Try switching the format to a stereo setting in the HDMI device properties.
- App Control — Some applications can take exclusive control of the audio device, which can prevent other sounds from being heard. This can leave the HDMI output silent even though the app itself may not be playing audio. Test by closing the suspected app or switching to a different audio source (like a system sound or a different media player) to see if sound returns.
For fast isolation: try the TV speakers instead of an external receiver, then try a different app or source. The two checks narrow down whether the issue is with the display path or a specific application holding the output.
This chart identifies the three main causes of HDMI audio being detected but silent—muted output, format mismatch, and app exclusive mode—along with actionable steps to diagnose each.
Sample Rate, Bit Depth, and Exclusive-Mode Conflicts
A mismatch between the configured sample rate or bit depth and the audio stream's format often causes silent audio playback. If the output device supports only a limited set of formats, switching to a different sample rate while exclusive mode is active can cause an initialization error, resulting in silence. Surround sound formats may also be affected, but a stereo baseline reduces variables and isolates the mismatch.
- Open your sound device’s properties in the system sound settings and set the default format to 2‑channel, 24‑bit, 44100 Hz (a common troubleshooting baseline).
- If audio issues persist, lower the sample rate to 48000 Hz.
- On the Advanced tab, uncheck “Allow applications to take exclusive control of this device” and uncheck “Give exclusive mode applications priority” if present.
- Restart playback and test with a track that previously caused failure.
TV and monitor audio menus, per-input sound settings, and volume routing
Per-input audio settings on the TV or monitor can override the expected output, routing sound to an unintended destination or applying a stored volume or mute state. Check the following settings in the display’s menu for the affected input:
- Check if the input is set to use TV speakers or external audio output.
- Check the per-input volume level, which may be independent of the main system volume.
- Check if mute is enabled for that specific input.
- Check ARC/eARC output routing to ensure audio intended for an external system reaches the correct destination.
- Check optical output settings if an external audio device is connected via that path.
TV, soundbar, and AVR routing issues including ARC or eARC behavior
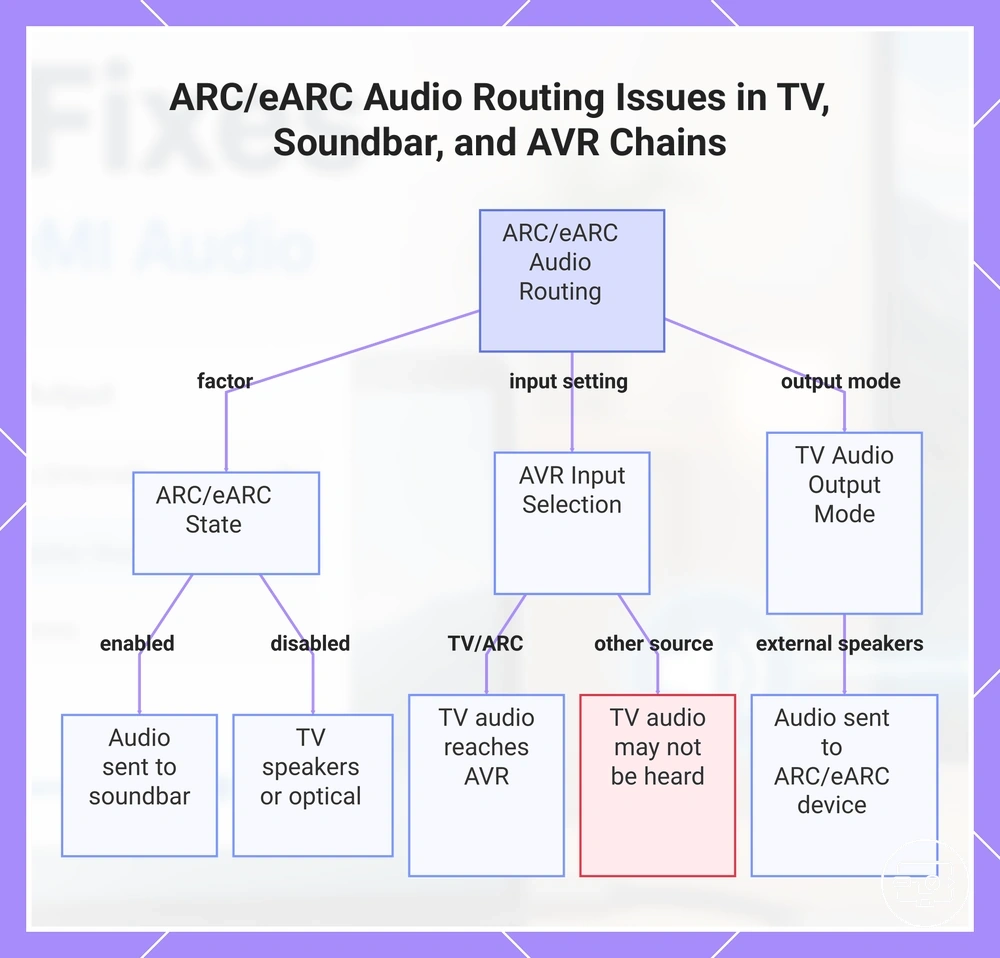
ARC/eARC can redirect audio away from the expected HDMI input when a soundbar or AVR is part of the chain, depending on whether ARC/eARC is active and how the connected device handles input selection. Identify where audio should land.
Common chains include a source connected to the TV with soundbar via ARC/eARC, or an AVR-centered chain. The endpoint in each chain depends on ARC/eARC status and input selection.
- ARC/eARC enabled with a soundbar connected to the TV → audio is typically sent to the soundbar rather than the TV speakers
- ARC/eARC disabled → the TV may output audio through its own speakers or pass it via optical, depending on the TV audio output mode
- AVR input set to TV or ARC channel → audio from the TV can reach the AVR; if the input is set to another source, TV audio may not be heard
- TV audio output mode set to external speakers (rather than TV speaker) → the TV sends audio to the connected ARC/eARC device if present
- If the endpoint is the receiver, selecting the TV output device may not produce sound
This chart shows how ARC/eARC status, AVR input selection, and TV audio output mode affect where audio ends up in a home theater chain.
ARC or eARC chains that move audio away from the HDMI input you expect
ARC or eARC chains can route audio away from the HDMI input you expect, meaning the active audio endpoint may not match the device you are controlling.
- Verify that the active input on the receiver or soundbar matches the source you intend to use.
- Make sure the TV audio output mode is set to the correct ARC/eARC port (often labeled ARC or eARC).
- Check that ARC/eARC is enabled on both the TV and the audio device. If not, routing may default to TV speakers or another output.
- Test by temporarily switching to TV speakers to see if audio plays through them. If so, the ARC/eARC signal may not be reaching the intended device.
Audio delay and lip-sync adjustments when sound is late or unstable
Audio delay—often called lip-sync error—is latency introduced by processing in the audio-video chain rather than a loss of audio. It occurs when video processing (such as upscaling or motion smoothing) takes longer than audio processing, or when an external device (receiver or soundbar) adds its own processing delay.
These tests can reveal whether the delay is consistent across sources or limited to one component.
- Bypass any external audio processor (receiver, soundbar) by connecting audio directly from the source to the TV to see if the delay disappears.
- Switch to a different app or input; if the delay only occurs on one streaming service or device, the source or app may be introducing extra processing.
- Simplify the audio format to a lower-latency option (e.g., stereo PCM instead of Dolby Digital); if the delay reduces or vanishes, processing of compressed multichannel formats may be the cause.
- Locate the lip-sync or audio-delay adjustment in the TV's sound menu or the external device's settings; adjusting this control can compensate for fixed latency but may need to be set differently per source.
- When using a gaming console, enable Game Mode on the TV to minimize video processing delay and bring audio back into sync.
Driver, Firmware, and Dock Software Issues Blocking HDMI Audio
If HDMI audio endpoints stay missing or silence continues after correct routing, the issue is often in the driver, firmware, or dock software layer. The goal is stable detection of the HDMI audio endpoint across reconnects.
- Update the operating system. Install any pending OS updates; they may include driver improvements or audio routing fixes. After updating, check for the HDMI audio device in sound settings.
- Update GPU and USB-C controller drivers. Check for updated drivers from your component manufacturer. Updated drivers may resolve detection problems. Reboot after updating and verify HDMI audio detection.
- Update dock firmware and management software. If available, use the dock vendor's utility to check for firmware updates. Firmware updates may change audio routing or endpoint enumeration. After updating, reboot both dock and computer, then retest.
- Reboot all devices and retest detection. Power cycle the computer, dock, and display to clear any transient state that may prevent endpoint detection. After reboot, confirm the HDMI audio device is listed in sound settings.
- Try a direct adapter control test. Connect the computer to the display using a USB-C to HDMI adapter (without the dock). If direct adapter works but the dock does not, the dock layer is the variable.
This chart shows the main steps to resolve HDMI audio endpoint detection issues caused by drivers, firmware, or dock software.

Graphics and USB-C controller drivers that restore HDMI audio devices
Updating the graphics driver and USB-C controller driver can help restore HDMI audio device detection. After updating, check for detection in sound settings.
- Update the graphics driver and USB-C controller driver using the OS update tool or the manufacturer's utility. The HDMI audio driver is usually bundled with the graphics driver package.
- Reboot the system after the driver updates are complete.
- Open sound settings and check the output device list for the HDMI audio device.
Dock firmware or virtual-display software that alters audio routing
Dock firmware or virtual-display software can alter how audio endpoints are exposed to the system, which can change audio routing. This can redirect audio streams to internal virtual outputs instead of the expected monitor speakers, or it can cause the system to see a different set of routing options. The following checks help identify virtualization behavior and confirm the dock layer's role.
- Check if a dock firmware utility or virtual-display driver is installed. Some docks include management software that registers additional audio endpoints.
- Check audio endpoint naming in the system sound settings. Endpoints created by dock software often contain the dock manufacturer’s name or appear as virtual outputs. If an unfamiliar endpoint appears only when the dock or virtual display is active, it is likely part of the software routing layer.
- Run a control test using a direct adapter connection. Bypass the dock by connecting the display using a standard USB-C to HDMI adapter (or a Thunderbolt to HDMI adapter if applicable). If audio works correctly over the direct path but fails through the dock, the dock’s firmware or software is likely the variable altering routing.
- Retest audio after temporarily disabling the dock’s audio-related services or uninstalling its management software. If audio behavior returns to normal, the dock’s software layer is likely the cause. This suggests that the endpoint exposure from the dock was interfering with the intended routing.
When the adapter is the limiting factor and what to verify before replacing it
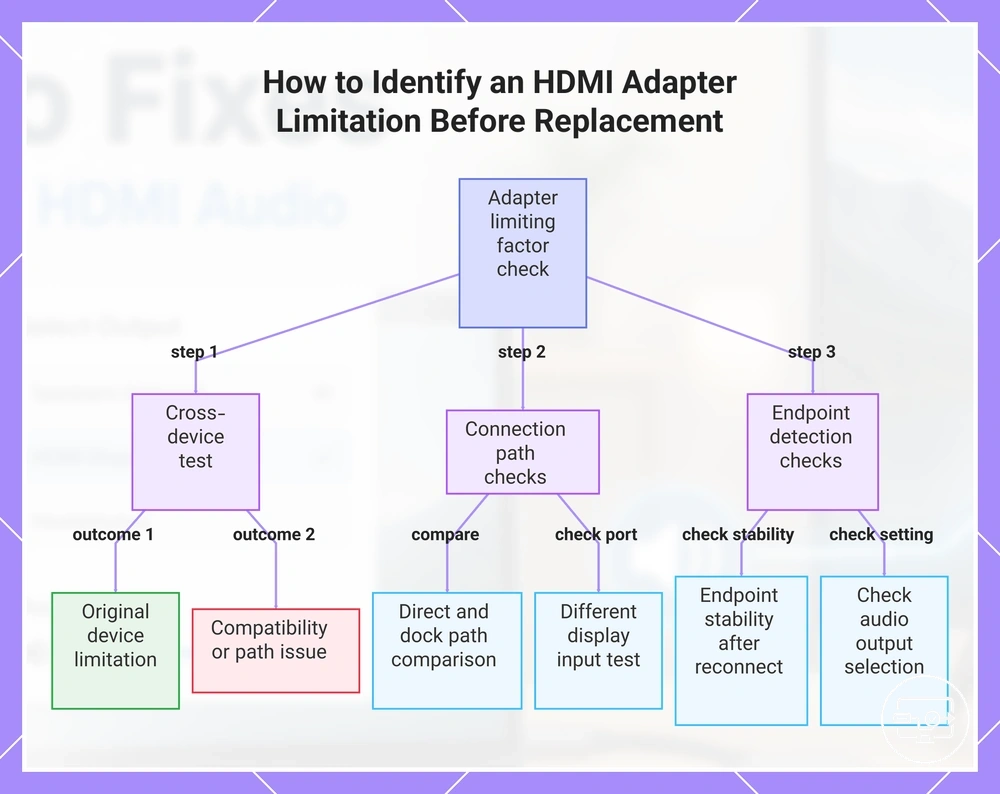
Only replace the adapter or cable path when evidence shows that the current setup cannot expose a stable HDMI audio endpoint across multiple conditions. Gather the following evidence to distinguish a path limitation from a configuration or device issue.
- Cross-test the adapter with another device – If HDMI audio appears on a different source, the limiting factor may be the original device rather than the adapter.
- Compare direct adapter connection vs. dock pass-through – A direct adapter-to-TV path can reveal whether a dock or intermediate hub is attenuating the audio signal.
- Test on a different TV or monitor input – Some HDMI ports on a display handle audio differently; stable detection on one input but not another points to a port or EDID mismatch, not a faulty adapter.
- Confirm consistent endpoint detection after reconnecting – If the audio endpoint appears and disappears randomly, the adapter may be negotiating the handshake unreliably, which can justify a replacement.
- Check whether the display’s built-in speakers are selected as the audio output – Many systems mute or reroute audio to a different output; confirming the correct endpoint is active can help avoid unnecessary adapter replacement.
If HDMI audio is never detected on any device, treat it as a compatibility or path issue, not a settings issue.
This chart shows the key verification steps to determine if an HDMI adapter is the cause of audio issues, helping to avoid unnecessary replacements.
FAQ: USB-C to HDMI no-audio scenarios and quick answers
Why is the audio device not detected after connecting a USB-C to HDMI adapter?
The source device may not recognize the adapter as an audio output if the USB-C port does not support DP Alt Mode or if the display does not report audio capability. See the USB-C to HDMI Compatibility overview for a broader look at how compatibility affects audio and video.
How do I select the correct audio output for the external display?
Open your system sound settings and check that the HDMI or external display is selected as the playback device. On macOS, go to System Preferences > Sound > Output; on Windows, right-click the speaker icon, choose Open Sound settings, then select the display.
How do I correctly reconnect or set up the adapter when HDMI audio appears inconsistently?
Disconnect the adapter from both the source and display, wait a few seconds, then reconnect firmly. Restart the source device with the adapter connected to reinitialize the audio path. See setup steps and output selection for a full walkthrough of reliable connection steps.
Does HDMI audio always pass through to the TV if the display input is correct?
No. Even when video displays correctly, the TV or receiver may require a specific input or audio mode to accept sound. Check the TV’s input settings and ensure the HDMI port is not set to a DVI mode, which disables audio. See TV and projector settings for guidance on display input audio settings.
What causes lip-sync delay when using a USB-C to HDMI connection?
Delay can occur when the source, adapter, or display introduces processing latency. This is more likely with certain TV audio processing modes or when using an A/V receiver that applies extra buffering. Adjusting audio output settings to match the display’s supported sample rate may reduce the offset.
Can ARC or eARC settings interfere with audio from a USB-C to HDMI adapter?
Yes. ARC or eARC can cause the TV to redirect audio back to a soundbar or receiver instead of using the TV speakers, even when the source is connected via USB-C to HDMI. If the expected audio device does not appear, disable ARC/eARC in the TV’s audio settings and test the direct connection again. For symptoms other than no audio, such as flickering or no video, see back to troubleshooting router.
Does using a hub or dock affect whether audio reaches the TV?
It can. Some hubs or docks may not support full audio channel negotiation, especially if they lack dedicated DisplayPort or HDMI alt-mode support. If audio works with a direct adapter but not through a hub, the hub’s chipset may be the limiting factor.
Should I check the audio format or sample rate on the source device?
Yes. Mismatched sample rates or unsupported audio formats can cause the display to output silence. On macOS, open Audio MIDI Setup and verify that the DisplayPort device uses a sample rate supported by the TV (typically 44.1 kHz or 48 kHz). Changing the format may restore audio without any hardware changes.
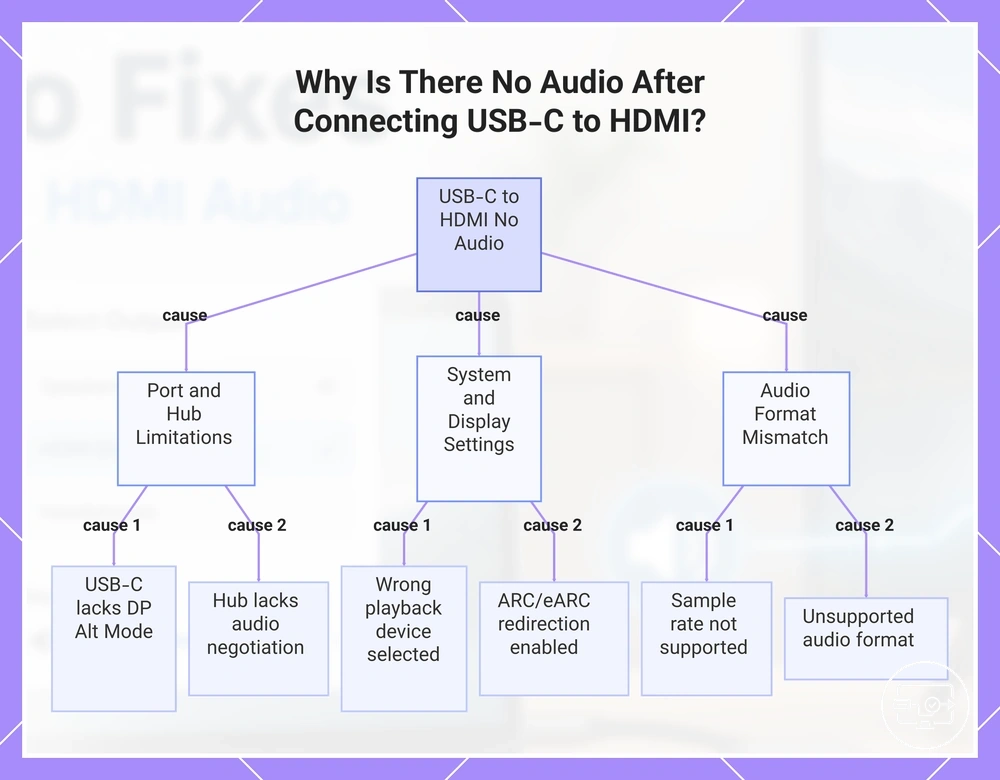
This chart shows the main causes of no audio when using a USB-C to HDMI adapter, organized by hardware limitations, settings conflicts, and audio format mismatches.