
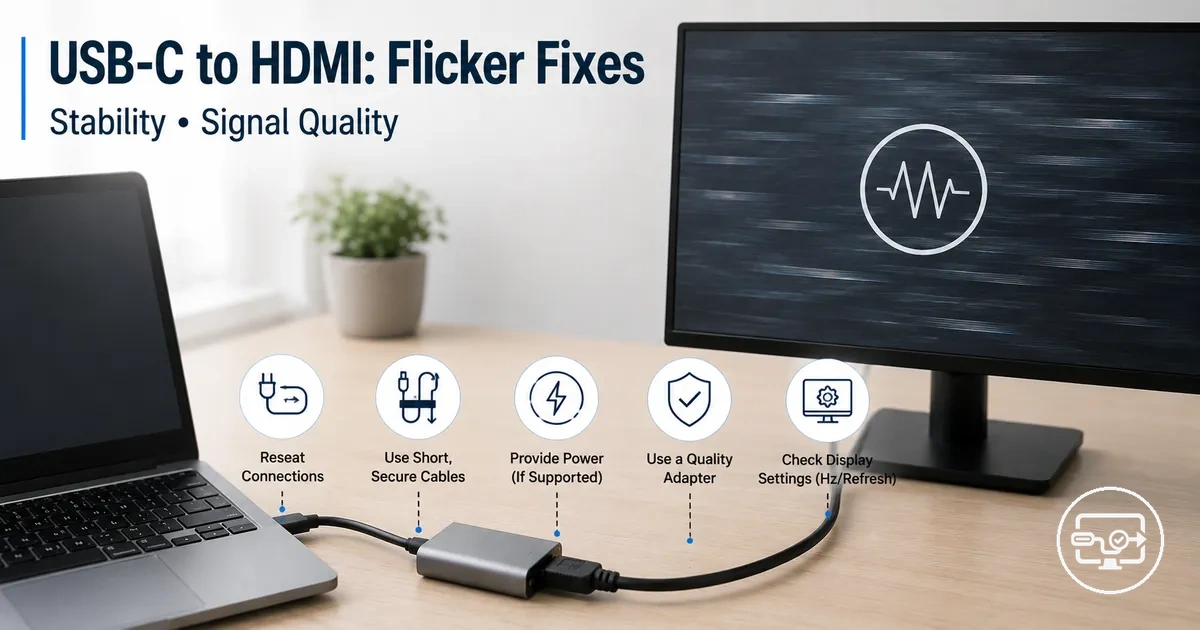
USB-C to HDMI Flickering or Dropouts: Compatibility Causes and Stable Fixes
USB-C to HDMI flickering or dropouts are often caused by instability somewhere in the signal chain. The chain runs from the source USB-C output through an adapter or hub, then across an HDMI cable to the display. Each link in that path can introduce signal problems, so test one link at a time instead of assuming the adapter is faulty.
- The laptop or device needs to support video output through its USB-C port, typically via DisplayPort Alternate Mode.
- The adapter or hub needs to be capable of converting the signal reliably at the resolution and refresh rate you need.
- The HDMI cable’s quality and length matter because a cable that works for 1080p may drop or flicker at 4K.
- Power delivery through the hub can affect the handshake, especially when multiple peripherals are drawing current.
Because conditions vary by device model, adapter class, and cable condition, no single fix works for every setup.
For a broader overview of compatibility factors, see the USB-C to HDMI Compatibility overview.
For example, a user connecting a 4K monitor through a basic USB-C hub may see the screen flicker or lose signal when the system tries to output 60 Hz. Lowering the refresh rate to 30 Hz or reducing the resolution to 1080p often stabilises the display because it reduces the bandwidth demand on the conversion path. If the flicker stops after that adjustment, the issue is likely bandwidth‑related rather than a defective adapter.
This page focuses specifically on flickering and signal drops. Other symptoms, such as no signal at all, distorted colours, or audio failures, may have different causes and are covered in the back to troubleshooting router.
What Flickering, Black Screens, or Intermittent HDMI Signal Usually Means in a USB-C Video Chain
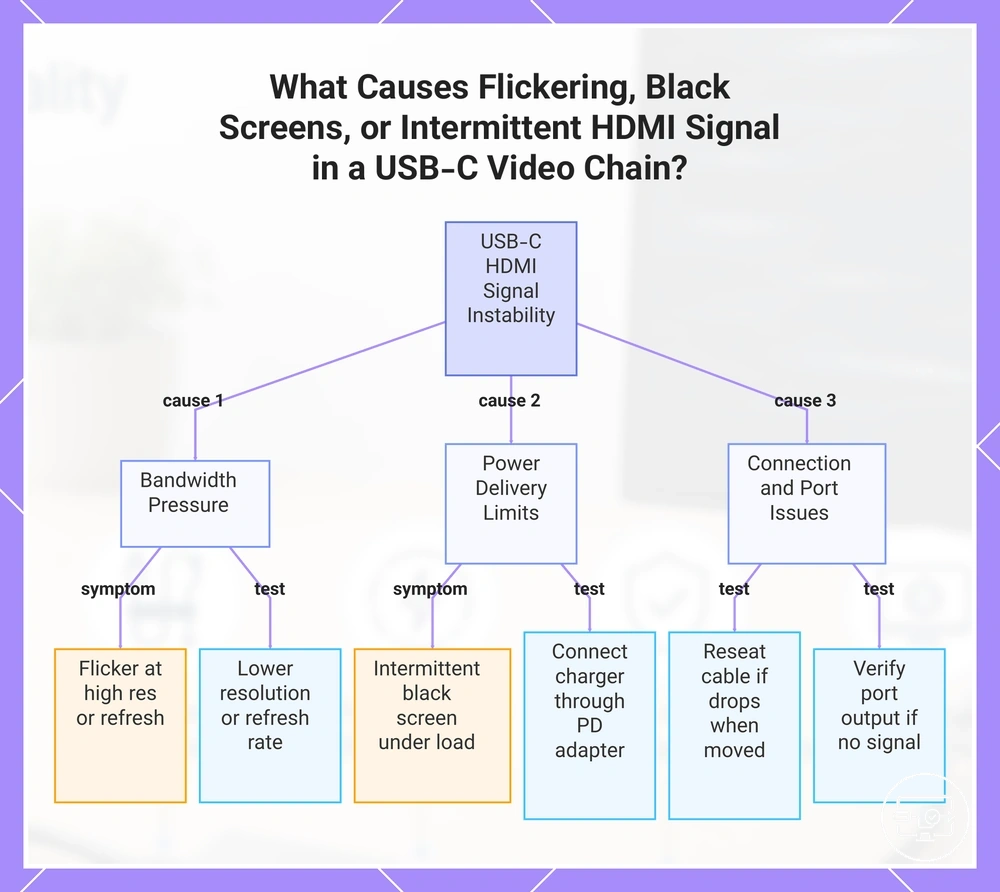
Flickering, black screens, or intermittent HDMI signal through a USB-C to HDMI connection usually points to instability in the video link rather than a single hardware defect. This instability can come from handshake resets, bandwidth pressure, power or thermal limits, or degraded signal integrity. A useful first step is to lower the display resolution or refresh rate to see if the flickering or dropout stops, which can indicate bandwidth as a limiting factor.
Each symptom pattern can point toward a different instability class.
- Flicker at high resolution/refresh rate → likely bandwidth pressure → test by lowering resolution or refresh rate.
- Intermittent black screen under load → may point to power delivery limits → test by connecting the laptop charger through a power delivery adapter.
- Signal drops when cable is moved → often a physical connection or cable quality issue → test by reseating or replacing the cable.
- Display shows no signal → usually a port-level video output gap → verify the host port supports display output.
For example, a 4K monitor that flickers at 60Hz but stabilizes at 30Hz or 1080p confirms bandwidth pressure; checking adapter and cable ratings is the next step.
This chart shows the three main instability categories for USB-C HDMI signal issues, their specific symptoms, and the recommended diagnostic tests.
Compatibility Conditions That Determine USB-C to HDMI Link Stability
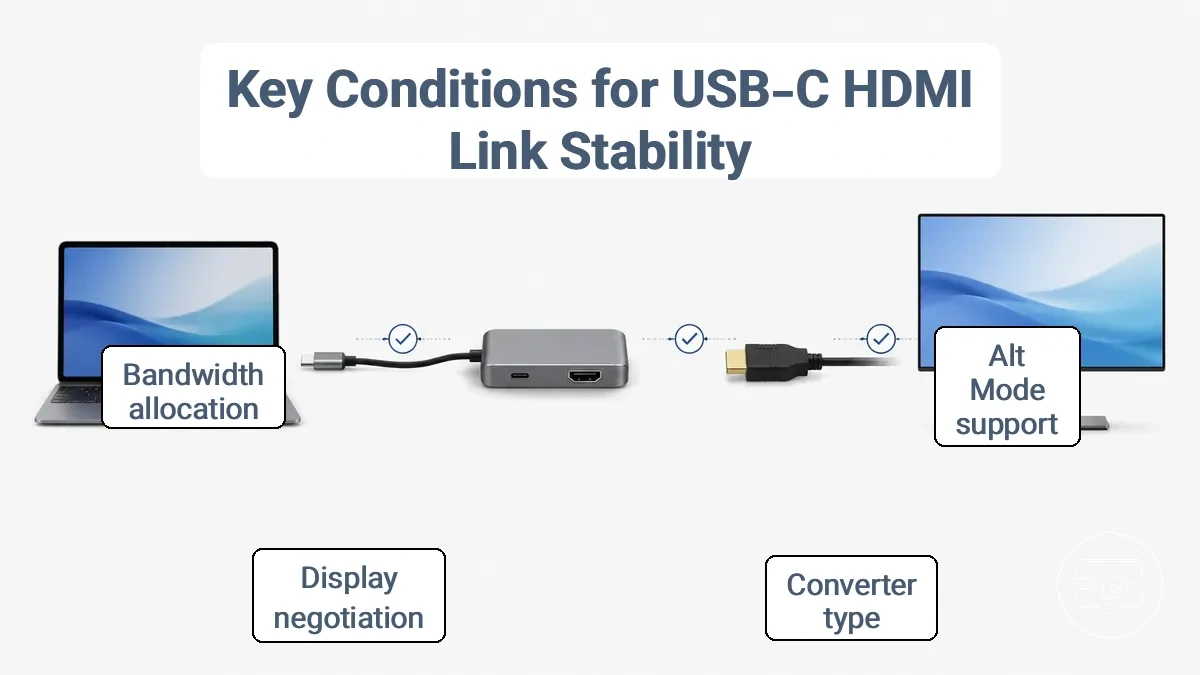
USB-C to HDMI link stability depends on the source device’s video output support and the conversion path, not on the connector shape.
Many USB-C ports on laptops and tablets include Alt Mode, but some devices limit USB-C to data or charging only. Checking the device specifications or looking for a DisplayPort icon near the port helps confirm this.
The adapter or hub itself matters: a passive converter that relies on the source’s Alt Mode may behave differently from an active converter that handles signal conversion independently. The display needs to negotiate a compatible resolution and refresh rate; when bandwidth or power through the hub is insufficient, dropouts can occur.
A laptop that supports Alt Mode connected to a 4K monitor through a hub that also charges the device may experience flickering if the hub does not allocate enough bandwidth for both video and data.
Before changing any hardware, verify these minimum conditions:
- The USB-C port supports DisplayPort Alt Mode (check device manual or spec sheet).
- The adapter or hub is rated for the intended resolution and refresh rate.
- The HDMI cable is fully seated and undamaged.
- The display input source is set to the correct HDMI port.
USB-C video output capability on the source device and the role of Alt Mode
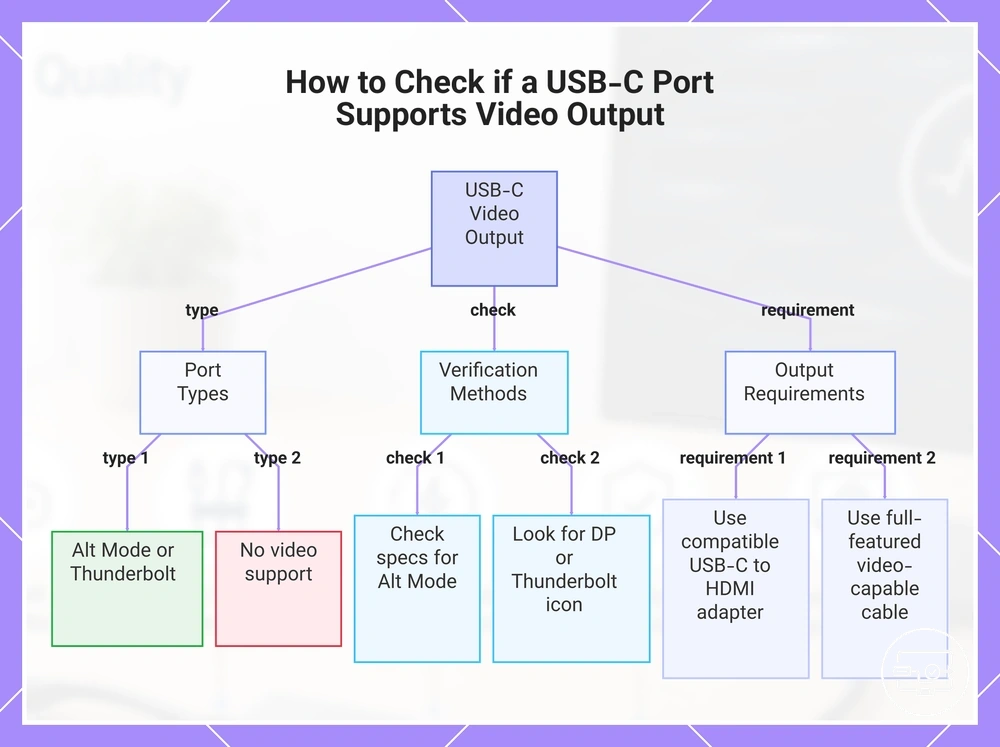
A USB-C port can output video for HDMI only if it supports DisplayPort Alt Mode or Thunderbolt—the port shape alone doesn't indicate capability. Check device specs or port markings to verify.
Port output capability falls into three types: Alt Mode, Thunderbolt, or none. Alt Mode and Thunderbolt ports can send video to an HDMI display using a compatible adapter, but resolution and refresh rate depend on the DisplayPort version and cable quality. Ports without video support cannot send any display signal, even with an adapter.
- Check the device specs for 'DisplayPort Alt Mode', 'USB-C with DisplayPort', or 'Thunderbolt 3/4'.
- Look for a DP or Thunderbolt icon next to the USB-C port on the device.
- Use a full-featured USB-C cable that supports video—avoid charge-only cables.
- Test with a monitor you know works and a certified USB-C to HDMI adapter.
- If no video appears, try a different port or cable—the port might be data-only.
This chart shows the types of USB-C video support, how to verify capability, and what is needed for video output.
Adapter, hub, or dock conversion behavior that can destabilize the HDMI handshake
When an HDMI signal passes through an adapter, hub, or dock, the extra conversion layer can interfere with the HDMI handshake. This can happen due to shared bandwidth limits, variable power draw, heat buildup, or conversion complexity. Isolating which component in the chain is responsible can help stabilize the connection.
- Adapter risks: Simple passive adapters may lack signal conditioning, causing EDID mismatches that force repeated handshake renegotiations.
- Hub risks: A hub’s shared power and bandwidth allocation can lead to intermittent dropouts, especially when other peripherals draw current at the same time.
- Dock risks: Docks often convert both video and data signals; internal heat from multiple conversions can degrade the HDMI signal and may trigger handshake failures.
In each case, the observed instability—flickering, black screens, or audio loss—may stem from a broken or incomplete handshake between source and display. Testing the source directly to the display bypassing the hub can help confirm whether the conversion layer is the cause, though it does not guarantee a permanent fix.
Display-side negotiation factors that cause re-handshake and brief dropouts
On the display side, factors like input selection, HDMI port capabilities, and mode toggles can cause re-handshake and brief dropouts. If a dropout occurs when a mode changes, a compatibility mismatch may be the cause.
- Input selection: Switching between HDMI ports or changing the active input can trigger a new handshake sequence, especially if the ports support different capabilities.
- Port capability differences: An HDMI port with limited bandwidth may fail to sustain higher modes, triggering renegotiation and dropouts when those modes are enabled. Trying a different HDMI port can help confirm if this is the cause.
- Mode/feature toggles: Enabling or disabling HDR, VRR, or other advanced features while the display is active can cause it to renegotiate the link, resulting in brief black screens or flicker.
Diagnosing flicker or dropouts by symptom pattern to narrow the failing link
When flicker, dropouts, or a black screen appear intermittently, the symptom pattern—including the trigger condition (movement, heat, or power event)—points to the likely failing component. Classifying the trigger before swapping components isolates the most probable cause class first.
An annotated symptom‑to‑cause map shows how trigger conditions point to the likely failing link.
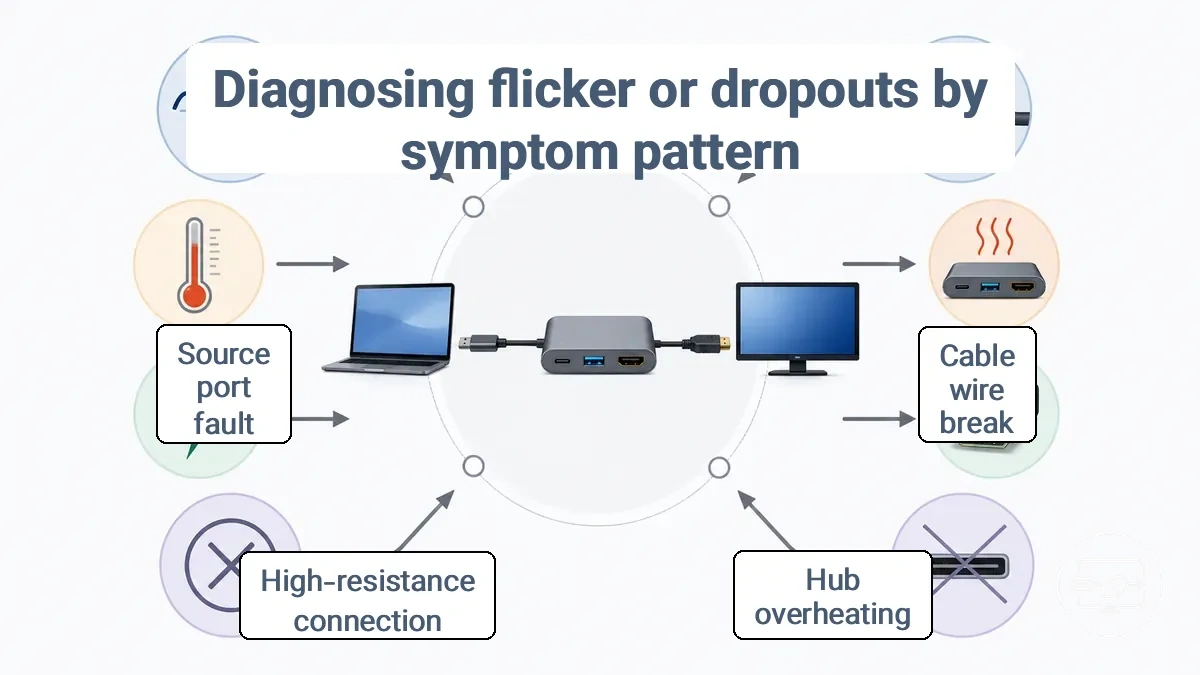
A diagnostic matrix matches common symptom patterns to their trigger conditions and the likely failing link. Each row includes a confirming test cue.
| Symptom Pattern | Trigger Condition | Likely Failing Link & Confirm By |
|---|---|---|
| Flicker or dropout only when the cable or connector is moved or touched | Movement (bending, vibration, jiggling) | Likely an intermittent wire break inside the cable or a loose terminal pin. Confirm by wiggling the cable while watching the display. |
| Flicker or dropout that worsens after the system has been running for a while | Heat (prolonged use, higher load, warm ambient) | Likely overheating in the hub, connector, or cable insulation. Confirm by checking for heat damage or swapping the cable after cooldown. |
| Intermittent flicker without obvious movement, often with dimming or power fluctuations | Power event (voltage drop, load change, surge) | Likely terminal corrosion, poor crimp, or high‑resistance connection. Confirm by performing a voltage‑drop test under load. |
| Black screen that returns after a reset, reconnect, or power cycle | Power event or signal loss (transient fault) | Likely unstable source port, hub, or cable fault. Confirm by testing with a different source or cable. |
Constant Flicker, Sparkles, or Snow: Signal Integrity Symptoms
Constant flicker, sparkles, or snow usually points to signal integrity problems or decoding instability caused by cable or connector noise or poor contact.
- Reseat both ends of the cable to improve connector fit and remove oxidation.
- Shorten the cable run or use a known-good, shorter cable to reduce signal attenuation.
- Remove any strain on the cable that might pull the connector out of alignment.
- Test a known-good cable and a different port to rule out a faulty cable or connector.
Periodic black screens and reconnect loops as handshake or power interruption symptoms
Periodic black screens and reconnect loops typically result from repeated handshake failures or transient power interruptions, not from permanent hardware faults.
These reconnect loops are often triggered by:
- Sleep/wake cycles: The monitor and source may fail to renegotiate the handshake after waking from sleep, causing a brief black screen followed by a reconnect.
- PD renegotiation: If the hub or source changes power delivery status, the video signal may drop and then restart the handshake process.
- Input switching: Manually switching inputs or the source automatically cycling through ports can reset the EDID handshake, producing a momentary black screen.
- Hub load changes: Connecting or disconnecting USB devices through the hub can shift power allocation, interrupting the HDMI signal and triggering a renegotiation.
To isolate the trigger, test with a direct source-to-monitor connection (bypassing the hub) or swap the source device. If the black screen stops, the hub’s handshake behavior or power delivery is likely the cause rather than the monitor or cable alone.
Dropouts that appear only at higher bandwidth modes such as 4K 60 Hz or HDR
When dropouts occur only at 4K 60 Hz or with HDR enabled, the issue usually points to a bandwidth or negotiation-sensitivity limit rather than a random failure. Finding that stability threshold reveals the highest mode your setup can reliably run.
- Reduce the resolution from 4K to 1080p while leaving 60 Hz and HDR on. If dropouts stop, the system is likely struggling with the higher pixel count at that bandwidth.
- Lower the refresh rate to 30 Hz while keeping 4K and HDR. If the signal stabilizes, the higher refresh rate's bandwidth demand is likely the limiting factor.
- Turn off HDR while staying at 4K 60 Hz. If dropouts disappear, the extra data HDR requires may push the link beyond its reliable capacity.
This threshold tells you which combination of resolution, refresh rate, and HDR the connection can handle. For more on how these settings interact, see performance expectations for 4K and HDR.
Stability fixes by reducing bandwidth demand and handshake sensitivity
When flickering or dropouts interrupt the display, lowering the negotiated HDMI bandwidth demand often resolves the instability before any hardware change is needed. The handshake between source and display determines the maximum resolution, refresh rate, and color depth the connection can sustain.
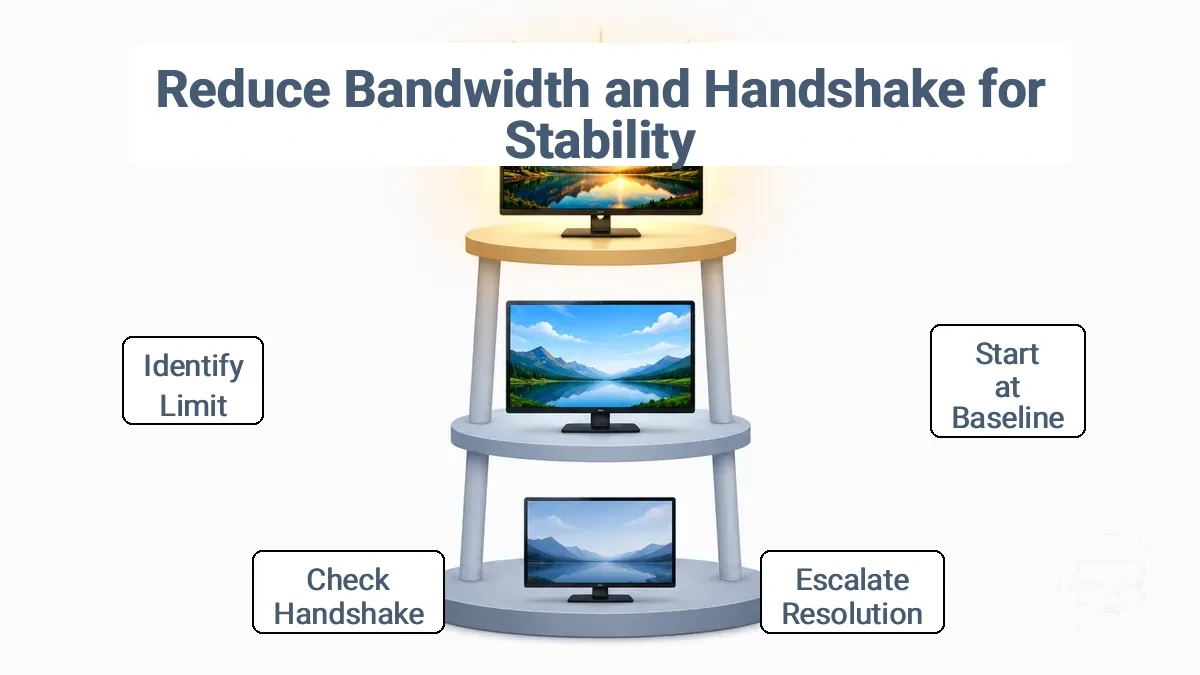
The settings ladder diagram starts from a stable baseline and escalates one variable at a time. Use these steps to isolate the bandwidth limit:
- Set the source output to a known-stable baseline, such as 1080p at 60 Hz without HDR, and confirm the display remains stable for several minutes.
- Increase the resolution to 1440p or 4K while keeping the refresh rate at 60 Hz. If flickering or dropouts reappear, the current bandwidth demand exceeds what the handshake can reliably negotiate.
- If stable, try increasing the refresh rate or enabling HDR one step at a time. Each successful step indicates the handshake is robust at that level; each failure indicates a limit in the cable, port, or display electronics.
Stability at a lower resolution suggests the connection can handle that bandwidth, but it does not predict stability at higher demands. When the connection stabilizes after a settings change, recheck setup steps to confirm cable and port integrity.
Resolution, refresh rate, chroma, and color depth changes that commonly stop flicker
Test a low-demand video mode first, then increase settings incrementally until flicker returns to identify the bandwidth breakpoint.
- Set the display to a low-demand mode: a low resolution (such as 1080p) at 60 Hz, reduced chroma sampling (4:2:0 or 4:2:2), and 8-bit color depth. If flicker stops, the original combination likely exceeded the cable or port bandwidth.
- Increase chroma to full sampling (4:4:4). If flicker reappears, the signal path may not carry full color information at the current resolution and refresh rate—this may indicate a bandwidth limit rather than a panel issue.
- Raise the resolution or refresh rate one step at a time (e.g., from 1080p to 1440p, or from 60 Hz to 120 Hz). The setting where flicker returns marks the highest stable mode for your connection; use that as a baseline for further tuning.
HDR, VRR, HDCP, and Format Toggles That Can Trigger Intermittent Connection Behavior
Changing HDR, VRR, HDCP, or output format toggles forces an HDMI handshake renegotiation, which can cause intermittent dropouts if the display or intermediate device struggles with the new signaling.
Treating these toggles as diagnostic tests helps isolate whether a specific feature class is triggering the instability.
- HDR toggling: Enabling or disabling HDR changes color depth and luminance metadata, increasing bandwidth demands. If the display or cable cannot reliably handle the higher data rate, the screen may go black briefly during renegotiation. Dropouts only when HDR is active indicate bandwidth or tone‑mapping limits, not a faulty cable.
- VRR toggling: VRR requires continuous communication to match frame rates. Toggling VRR resets this negotiation, and some displays may re‑evaluate HDCP compliance during the transition. Connection drops when VRR is enabled suggest a display VRR implementation issue or inadequate link signaling capacity.
- HDCP toggling: HDCP encryption handshake occurs during protected content playback. Toggling HDCP forces the entire chain to re‑authenticate, potentially exposing version mismatches. A black screen or HDCP error only after changing this toggle suggests version incompatibility or a device that drops HDCP support when other features are active.
- Output format changes: Changing resolution or refresh rate triggers a new EDID exchange; including HDR or higher subsampling increases bandwidth demand. Intermittent flicker or dropouts after a format change point to link instability, often from cable limitations or EDID mismatches.
Sleep, wake, and power-saving behaviors that interrupt USB-C display output
Sleep, wake, and power-saving events may interrupt USB-C display output when they cause a failed digital renegotiation. Testing each behavior individually identifies which power-state change triggers the dropout. A change in symptoms after testing may confirm the power event as the trigger and suggest adjusting power management settings rather than replacing hardware.
- Sleep and wake: Put the system to sleep and wake it. If the display stays black or shows 'No Signal' after wake, the handshake may need a fresh reset. Adjusting USB power management settings (if available) may allow the display to reconnect after wake.
- Lid close (laptop): Close the lid briefly while an external monitor is connected. If the display drops out and does not recover, the system may be suspending the USB controller. Changing power settings for lid action (e.g., 'Do nothing') helps confirm this cause.
- USB suspend: Check whether the dropout occurs after a period of inactivity without full system sleep. Aggressive USB suspend can disconnect the monitor. Testing with USB selective suspend disabled in system power settings may prevent the interruption.
- Keep each test reversible and avoid disabling safety-critical power saving system-wide.
Cable and connector constraints that cause flicker or signal drops
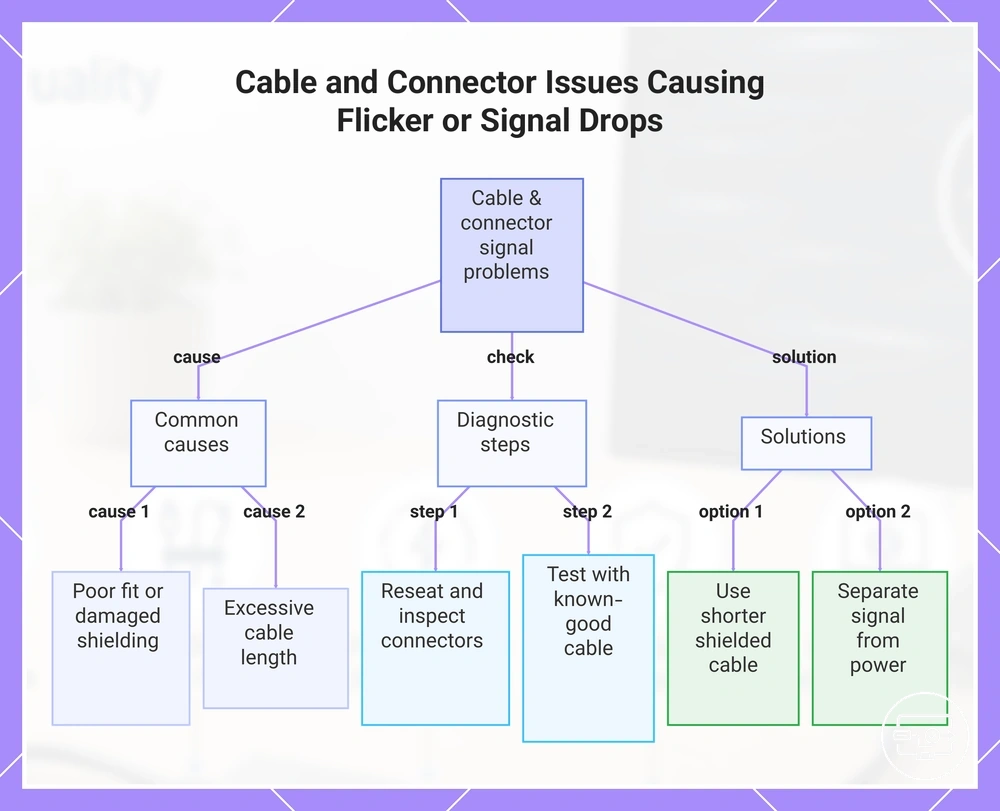
Flicker or signal drops often originate from signal integrity problems at the cable or connector interface. Poor fit, excessive length, or damaged shielding can degrade the signal before it reaches the display, causing intermittent blackouts or loss of connection.
Cable and connector condition affects signal quality under load. A loose connector, strained cable, or mismatched length can cause the signal to weaken or fluctuate, leading to dropouts. A simple confirming test is to reseat both ends of the cable, then try a shorter or known-good replacement while observing whether the symptom changes.
- Verify the cable is fully inserted and the connector is not loose.
- Inspect for visible damage or strain at the connector ends.
- Separate signal cables from power cords to reduce interference.
- Try a shorter cable if the current run is long.
For example, a monitor that flickers only when the cable is bent or when a nearby appliance turns on suggests a marginal connection that a longer or unshielded cable may expose. Switching to a shorter, better-shielded cable often stabilizes the link. Deeper long-run wear and reliability and signal stability factors are covered in the section on reliability and signal stability factors.
This chart shows the common causes of flicker or signal drops from cable and connector problems, along with diagnostic steps and solutions.
Cable length, shielding, and fit as the most common physical instability variables
Cable length, shielding, connector fit, and strain are common physical instability variables. Each has a distinct failure signature and a confirming test.
- Length: A longer cable can introduce signal dropouts or flickering. Test: Compare performance with a shorter known-good cable; if the problem disappears, length is a likely contributor.
- Shielding: Inconsistent or absent shielding may allow noise ingress, causing intermittent interference or picture artifacts. Test: Check shield continuity with a multimeter, or observe whether moving the cable changes the noise pattern.
- Connector fit: A loose or worn connector may produce flickering or complete dropouts when the cable is moved. Test: Gently wiggle the connector at the port; if the signal cuts in and out, re-seating or inspecting for bent pins can confirm the issue.
- Strain: Physical tension on the cable or connector can damage internal wiring, leading to intermittent signal loss when the cable is under load. Test: Apply slight tension to the cable near the connector and note whether the dropout correlates with the applied strain.
When an active cable or a different adapter class is the correct stability change
If flickering or dropouts continue after you have eliminated loose connections and port issues, the correct stability change is to switch from a passive conversion approach to an active cable or a different adapter class — rather than continuing to swap cables. This decision depends on three criteria: mode requirement, run length, and hub instability.
- Mode requirement: If the source must output a higher data-rate mode that the passive cable cannot sustain without errors, switching to an active cable or a different adapter class can restore stable signal integrity.
- Run length: When the needed cable distance exceeds the passive design’s effective range, a conversion approach that includes active electronics or a different adapter class can maintain a usable signal over longer runs.
- Hub instability: If a hub or extender introduces timing or signal degradation that a passive link cannot compensate for, a conversion change often resolves the resulting dropouts.
Hub, dock, and power delivery factors behind intermittent HDMI output over USB-C
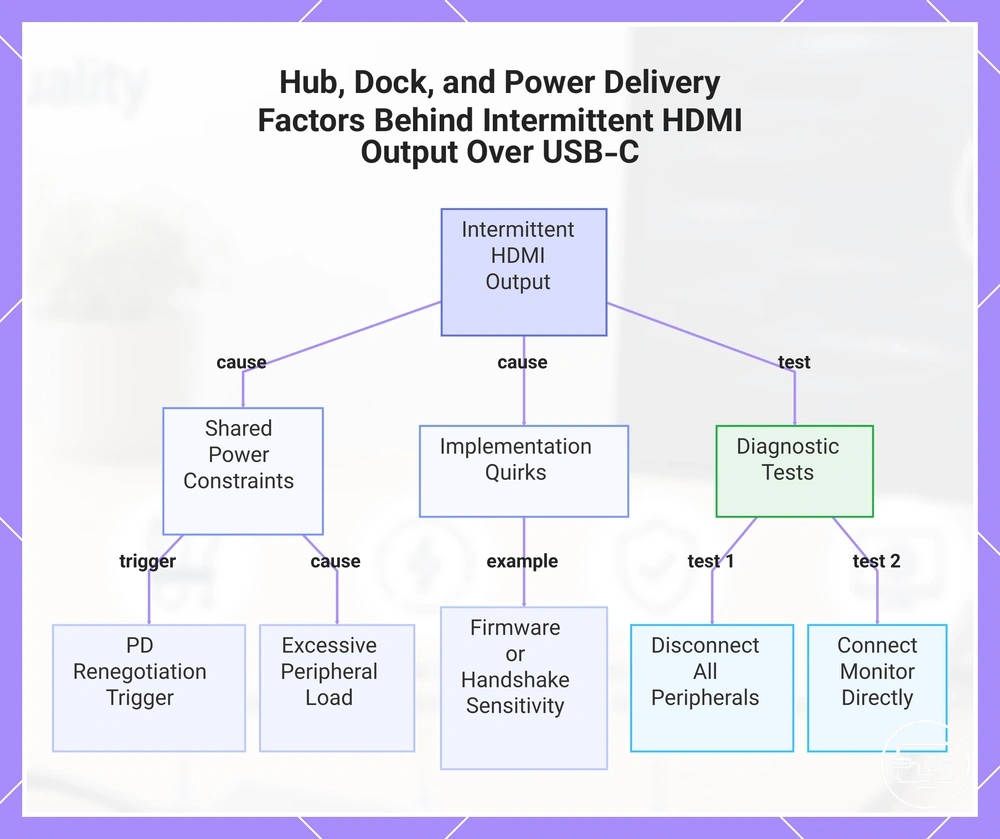
Intermittent HDMI output through a hub or dock often stems from shared power and bandwidth constraints. The hub or dock draws from a single USB-C connection; marginal power delivery or excessive peripheral load—not a permanent hardware failure—can cause dropouts or flickering.
- PD renegotiation: Shared power delivery input: a change in device activity triggers renegotiation, which can cause a brief black screen or dropout.
- Peripheral load: High-power accessories (drives, USB devices, powered monitor) can exceed available bus power, leading to intermittent dropouts.
- Implementation quirks: Firmware or controller-handshake sensitivities may cause short video interruptions when USB or charging activity changes.
A controlled test can help confirm the factor: disconnect all peripherals except the monitor and power supply; observe if dropouts stop. If stable, reconnect devices one by one to identify the triggering load.
Alternatively, bypass the hub by connecting the monitor directly to the laptop with a known video-capable cable; if dropouts disappear, the hub or its power configuration is likely the source. Changing the power state (higher-wattage charger or PD-rated source) can reveal insufficient power delivery as a root cause.
This chart shows the main causes of intermittent HDMI output through a hub or dock and how to diagnose them.
Adapter or hub overheating patterns and the stability impact of thermal buildup
Thermal buildup is a likely cause when dropouts appear after several minutes of use and then resolve after the device cools down. The hub or adapter may throttle performance or reset itself as internal temperatures rise, leading to repeated disconnections and slow data transfer.
Use this checklist to confirm whether heat is the root cause of instability:
- Note the time-to-failure. If dropouts consistently begin after a similar period of use, thermal buildup is a common indicator.
- Observe throttling or reset behavior.
- Track dropout frequency and recovery. Frequent disconnections that stop after the hub is unplugged and allowed to cool suggest a heat-related pattern.
Note: Warmth during normal operation is not automatically a defect. Temperature alone does not confirm failure; it is the combination of overheating with performance degradation that points to thermal instability.
Bus power limits and charging passthrough conditions that lead to HDMI dropouts
Bus power limits and charging passthrough conditions can cause HDMI dropouts when using a USB‑C hub or dock. Testing with and without external power helps confirm whether power budget changes are involved.
- Bus‑powered operation draws all power from the host, limiting the available power budget. When the display or other connected peripherals demand more power than the bus can supply, the HDMI signal may become unstable and cause intermittent dropouts.
- Charging passthrough (external power) provides a separate power source, but changes in the charging state—like plugging or unplugging the charger—can trigger a PD renegotiation. That renegotiation resets the power budget and may cause the HDMI link to drop and reconnect, leading to a dropout loop.
Software and firmware conditions that can look like hardware failure
Software and firmware conditions can mimic symptoms of a bad USB-C to HDMI cable or adapter. Validate the software layer before replacing hardware. Changes in the GPU driver, operating system update, or dock firmware can alter negotiation behavior, which in turn affects signal stability.
The following checklist of high-impact update and reset checkpoints can isolate the cause:
- Update the GPU driver to the latest stable version.
- Install the most recent OS update.
- Refresh the dock firmware if a dock is in use.
- Update the display firmware if the monitor supports it.
After each update or firmware refresh, test the connection and note whether the symptom changes. If the issue resolves after a firmware update, the problem was likely in the software negotiation layer rather than the cable or adapter. If symptoms persist after all checkpoints, hardware troubleshooting becomes the appropriate next step.
This chart shows the update checkpoints and outcome interpretation to determine whether a USB-C to HDMI connection issue is caused by software or requires hardware troubleshooting.
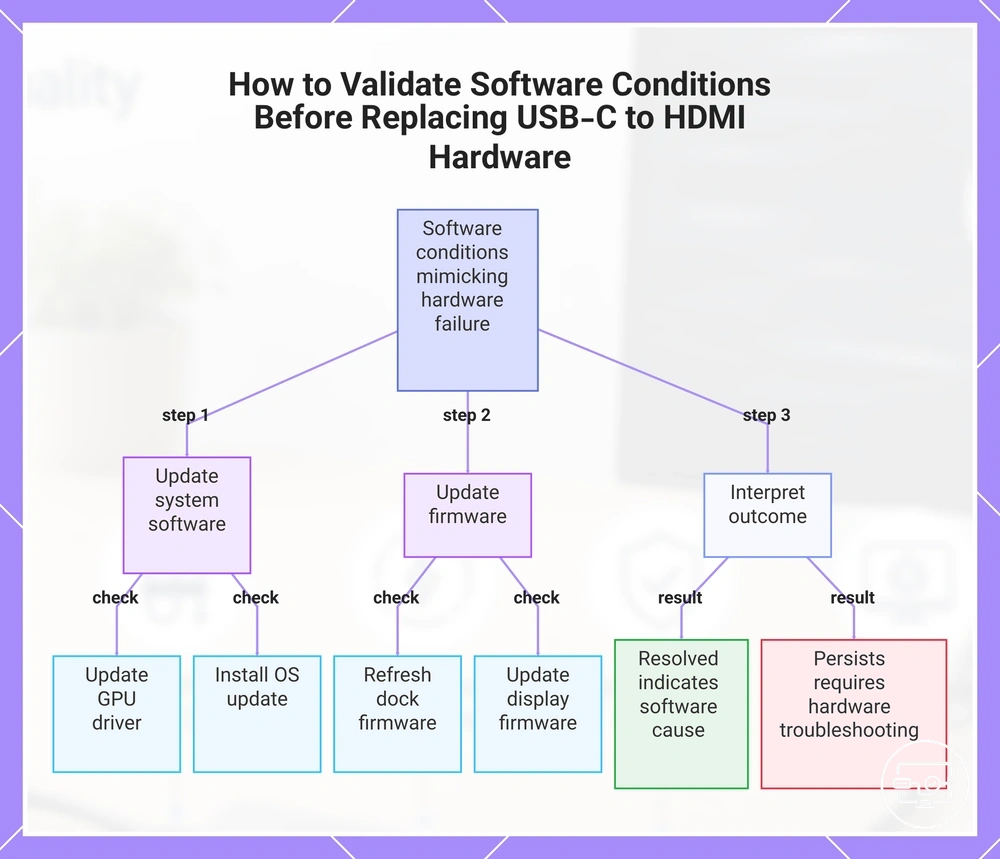
Driver, OS, and display firmware update checkpoints that affect link negotiation
Symptom changes after each update checkpoint isolate the layer—GPU driver, operating system, dock firmware, or display firmware—that affects link negotiation.
- GPU driver update: A driver update may improve link negotiation or compatibility. If negotiation problems persist after a driver update, the cause likely lies outside the GPU software layer.
- OS update: OS updates can affect link negotiation and stability. If symptoms change after an OS update, the OS layer is a likely source; if symptoms remain the same, deprioritize software troubleshooting.
- Dock firmware update: Dock firmware updates may resolve auto-negotiation failures or dropouts. If symptoms improve after the update, the dock is likely the culprit; if no change, the issue likely lies in another component.
- Display firmware update: Display firmware updates can adjust negotiation parameters. If stability improves after the update, the display was the bottleneck; if no change, the display is less likely the source.
A Repeatable Isolation Sequence to Confirm the Root Cause and Decide What to Replace
Isolate the failing link by changing only one variable at a time while using the rest of the signal chain as a baseline.
- Establish a baseline by connecting the source to a display with a known-working cable and confirm that the issue does not occur in this setup.
- Swap the known-working cable with the original cable. If flickering reappears, the original cable is implicated. Repeat to confirm.
- If the cable is not implicated, swap the adapter (if used) with a known-working unit. Observe the outcome; if flickering stops, the adapter is implicated. Confirm by swapping back.
- If the adapter change does not alter the behavior, connect the source to a different display (or the display to a different source). Observe and document the outcome. If flickering stops, the original display is implicated.
- After each swap, return to the baseline and repeat the test; only a repeatable outcome reliably implicates a component.
The following table maps the test-change–outcome logic used in the isolation sequence:
| Test Change | Observed Outcome | Component Implicated | Next Action |
|---|---|---|---|
| Swap cable with known-good cable | Flickering stops | Original cable implicated | Confirm by re‑installing original cable; if flickering returns, replace cable |
| Swap adapter with known-good adapter | Flickering continues | Adapter not implicated | Proceed to test display or source |
| Connect to different display | Flickering stops | Original display implicated | Confirm by reconnecting original display; if flickering returns, replace or service display |
Baseline Matrix with One Source, One Adapter, One Cable, and One Display
This baseline matrix yields either a stable or unstable result. A stable result indicates core components are functional; an unstable result points to a problem within the minimal chain. Re-run the test before concluding; a single pass can be misleading.
| Baseline condition | Result | What it eliminates or implicates |
|---|---|---|
| Single source → single adapter → single cable → single display | Stable | May eliminate source, adapter, cable, and display as the primary cause. Problem likely involves hubs, docks, or additional peripherals. |
| Same chain after repeat run | Unstable | May implicate one or more components in the chain. Repeat the test swapping each part to help identify the faulty element. |
Controlled escalation from low bandwidth to high bandwidth until failure appears
This method tests one variable at a time instead of changing multiple settings at once. It reveals which factor exceeds bandwidth and causes instability by isolating each change.
- Increase resolution step by step from a known stable baseline. If it fails at a higher resolution but passes at the one below, the breakpoint may indicate a bandwidth ceiling at that resolution level.
- Reset to the passing resolution and then escalate the refresh rate incrementally. If the connection fails at 60 Hz but remains stable at 30 Hz, the refresh rate may be the limiting demand factor.
- After establishing a stable resolution and refresh combination, test enabling HDR. If enabling HDR introduces instability at a setting that previously worked, the additional data overhead can push the total demand past the cable or source capacity.
- Finally, add peripheral load through the same USB-C connection—connect additional devices or increase data throughput—to see if bandwidth sharing triggers failures. If stability breaks only with peripherals active, the breakpoint may reflect a shared bandwidth constraint rather than a pure video signal limit.
Replacement cues that separate a bad cable from a bad adapter or a weak hub design
To tell whether the cable, adapter, or hub is the problem, use a few swap cues that confirm which component is at fault.
- Swap the cable. Use a video-capable cable and test with another display.
- Swap the adapter. Use a different adapter or connect directly without an adapter.
- Swap the hub. Remove the hub and connect the display directly to the computer.
Each swap result points to the faulty component and gives a confidence level.
| Swap result | Component at fault (confidence) |
|---|---|
| Display works with a video-rated cable swap but not with the original cable | Original cable – likely |
| Display works with a different adapter but not with the original adapter | Original adapter – possible |
| Display works when the hub is bypassed but not when connected through it | Hub – likely |